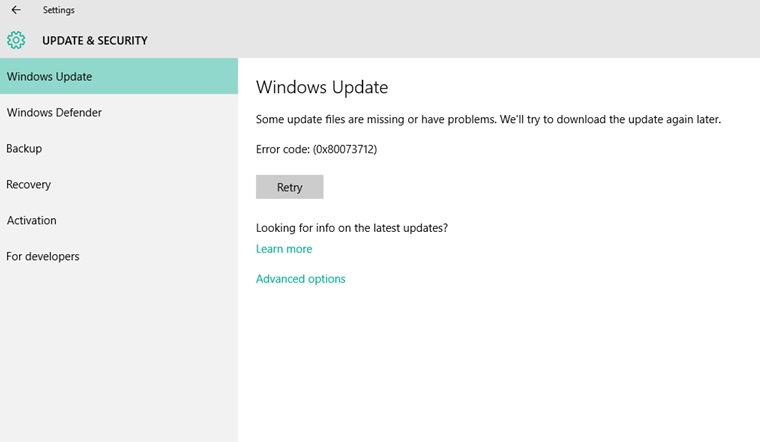
Windows 10, Microsoft’s popular operating system, offers users a robust computing experience with various features and functionalities. However, like any software, Windows 10 is not immune to errors, and one such error that users may encounter is the “0x80073712” error.
This error code can be perplexing and disruptive, especially when it prevents you from performing essential tasks such as updating or installing software.
In this comprehensive guide, we will explore the meaning of the “0x80073712” error in Windows 10, its significance, potential causes, and effective solutions to help you resolve this issue and keep your Windows system running smoothly.

Contents
Understanding the 0x80073712 Error
Before delving into the details, let’s break down the error code itself:
- “0x80073712” is a hexadecimal error code that Windows uses to indicate a specific issue or problem.
- This error code typically appears when there is a problem with the Windows Update service or the Windows Component Store (also known as the WinSxS folder).
In essence, the “0x80073712” error occurs when Windows 10 encounters difficulties while trying to access or manage system components, particularly during the Windows Update process.
Read Also:
Common Symptoms of the Error
When you encounter the “0x80073712” error in Windows 10, you may experience the following symptoms:
- Error Message: The primary symptom is the appearance of an error message that explicitly states “0x80073712.”
- Windows Update Issues: The error often prevents Windows Update from completing successfully, leading to failed update installations or the inability to check for updates.
- Software Installation Problems: You may encounter difficulties when attempting to install or update software packages, as the error can interfere with the installation process.
Now that we understand the symptoms, let’s explore the potential causes of the “0x80073712” error.
Possible Causes of the Error
To effectively troubleshoot and resolve this error, it’s crucial to identify its underlying causes. Here are some common reasons behind the “0x80073712” error in Windows 10:
- Corrupted System Files: The error often occurs due to corrupted or missing system files, particularly those related to the Windows Component Store.
- Windows Update Service Issues: Problems with the Windows Update service, such as a malfunctioning update component or incorrect configuration, can trigger the error.
- Third-Party Software Interference: Certain third-party software, including antivirus or security programs, may interfere with Windows Update or the system’s component management.
- Incomplete or Failed Updates: If previous Windows updates were not installed correctly, it can lead to the “0x80073712” error when attempting to install new updates.
Now that we’ve identified the potential causes, let’s explore the solutions to fix the “0x80073712” error:
How to Fix Windows Update Error 0x80073712
There are a few methods to solve this error. With proper guidance and steps, the users would be able to completely eradicate the Update Error 0x80073712 from its roots.
Method 1 – Run the Windows Update Troubleshooter
Every Windows operating system has an inbuilt troubleshooter, and it has proved to work very efficiently in solving many problems in the system. So here are the steps the users could use for applying the troubleshooter application in the system:
Step 1 – The user can search for the application by pressing the Windows key and then typing the application’s name. [The user has to click on the option troubleshooting under the control panel.]
Step 2 – Then the user has to click on the fix problems of updates under the System and Security.
Step 3 – After that last step, the application of troubleshooting would start. The application would find the problem and highlight it after solving it. The user has to wait until the running of the scan gets completed.
Step 4 – After that, the user has to try updating the window again. If they find the Windows Update Error 0x80073712 again then they have to try a different solution.
Method 2 – Using the System Update Readiness Tool
Users don’t always release that they might have to use this tool to prep their window 7 device for the update to window 10. And sometimes using this tool actually helps in solving this problem.
The following steps would help the users to do so:
Step 1 – The user has to download the tool from here
Step 2 – Then the user has to run the tool in their device. And then the user has to follow the onscreen instructions
Step 3 – After the scan gets over the user has to check if their problem is solved or not.
Method 3 – Use Windows Media Creation Tool
Sometimes this issue is not fixed till the user performs an in-place update. In this solution, we recommend using the Windows Media Creation tool for performing the in-place update. The following steps would help in doing so:
Step 1 – First, the user has to download the app Windows Media Creation tool
Step 2 – Then they have to accept the prompts and pop-up Windows.
Step 3 – Then the user has to select the “Upgrade this PC Now” option.
Step 4 – Then they have to select the “Keep Personal Files” option and in the next prompt that the user has to click on the install option.
Step 5 – After that, a set up would start, the user has to wait till it finishes. Then see if the Error 0x80073712 still stays or not.
Method 4 – Run the DISM
Just like the troubleshooting application. The system has many other in build applications. Among which there is a tool name Deployment Image Servicing and Management Tool. The tool serves Windows.
And can help in solving any kind of problem with the Windows updates. Many people around the internet server stated that this had helped them solve the problem too
The following steps would help the user to implement the solution:
Step 1 – The user has to press the Windows key and X key, together and then select the Command Prompt (Admin) from the menu what will pop-up on the window [the user can also Click on Start and then type cmd in the box after that the user has to right-click on cmd and lastly they need choose Run As Administrator.
Step 2 – When the command prompt opens up the user has to put in the following commands into the box:
DISM.exe /Online /Cleanup-image /Scanhealth
DISM.exe /Online /Cleanup-image /Restorehealth
Note – The users have to be careful while inputting these commands on their computer, as anyone small mistake can hamper their computer or other devices. The user has to make sure that they press “enter” after every command for it to get implemented. And the user has to make sure that the first command is completed before they start implementing the second one.
Step 3 – The user has to wait until all the commands have been applied correctly. And then they have to close this application by either clicking on the close icon or by typing exit and then press Enter.
Step 4 – After that lastly, the user has to run the updates again and check if the Update Error 0x80073712 has been solved or not.
Method 5 – Reset Basic Elements Using Commands
Many times, these kinds of problems can be solved by using and inputting very simple commands. Some users have used this method and they have stated that it has been effective in rooting up their problems.
The following steps would help other users to solve their problems too:
Step 1 – The user has to open the run dialog box (they can do it by pressing Windows key and R key together).
Step 2 – Then they have to type in the box “cmd” and then press shift control and enter together to get the administrative privileges.
Step 3 – After that, the user has to put in the following commands in the window that opens up next:
net stop trustedinstaller

cd %windir%\winsxs

takeown /f pending.xml /a

cacls pending.xml /e /g everyone:f

del pending.xml

net stop wuauserv

ren c:\Windows\SoftwareDistribution softwaredistribution.old

net start wuauserv
Step 4 – After putting all the commands in the device, the user has to finally check if their Error Code 0x80073712 has been solved or not.
Also Read:
- Error Code 0x800705b4
- Windows Error Code 0x80070570
- Update Error Code 0xc1900200
- Stop Error Code 0x0000003b


