Steam is the largest digital video game provider developed by Valve and has millions of users worldwide. Undoubtedly, many users love using Steam because of its unique and exciting features that most other gaming platforms do not provide.
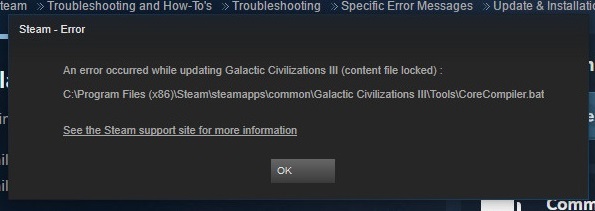
It provides the users with video streaming, server hosting, cloud storage, in-game voice, selection of contents, and many more. But unfortunately, many users are facing the Steam Content File Locked error while updating the games.
Steam Content File Locked error simply means that the hard disk can no longer write the updated files and needs a fix. There can be many causes behind Content File Locked error, and we are going to discuss all of them in this article.

Contents
Understanding the “Steam Content File Locked” Error
Before we delve into the details, let’s break down the error message itself:
- “Steam” refers to the popular digital distribution platform used by gamers to purchase, download, and play games.
- “Content File” signifies the game files that Steam downloads and installs on your computer.
- “Locked” indicates that these files are currently inaccessible or cannot be modified.
In simple terms, the “Steam Content File Locked” error occurs when Steam is unable to access, modify, or update certain game files, preventing you from playing or updating your games.
Read Also:
Common Symptoms of the Error
When you encounter the “Steam Content File Locked” error, you may experience the following symptoms:
- Error Message: A pop-up error message appears, indicating that one or more content files are locked.
- Game Update Failures: Steam may fail to update your games, leaving them outdated.
- Game Launch Failures: You may be unable to launch specific games, and attempting to do so results in the error message.
- Inability to Install New Games: If you’re trying to install a new game, you may encounter this error during the installation process.
Now that we understand the symptoms, let’s explore the potential causes of the “Steam Content File Locked” error.
Possible Causes of the Error
To effectively troubleshoot and resolve this error, it’s crucial to identify its underlying causes. Here are some common reasons behind the “Steam Content File Locked” error:
- File Permissions: In some cases, file permissions may be incorrectly set, preventing Steam from accessing or modifying game files.
- Antivirus or Firewall Interference: Overly aggressive antivirus or firewall settings can block Steam’s access to game files, triggering the error.
- Background Process Conflicts: Background processes or applications running on your computer may interfere with Steam’s file management.
- Disk Read/Write Errors: Hard drive issues, such as bad sectors or disk read/write errors, can cause files to become locked.
- Steam Client or Game Installation Issues: Problems with the Steam client or game installations themselves may lead to file locking errors.
Now that we’ve identified the potential causes, let’s explore the solutions to fix the “Steam Content File Locked” error:
How To Solve Steam Content File Locked Error
Are you also facing the Steam Content File Locked error and have no idea how to fix it? Then, you are in the right place, as here we will provide you with every possible and relevant solution to fix the issue.
There is no need to worry a lot about this error as it is easier to fix it than you think. We will start here from scratch and what you have to do is to give a read to the solutions given below and apply anyone which suits you the best. So, let’s begin…
Method 1 – Mend Corrupt Files
First and foremost, you must check for corrupt or broken files in your PC as these corrupt and damaged files are the reason for not just the Content File Locked error but most of the errors that users face.
So, it’s a good practice to repair these files regularly to avoid such kind errors in your device. In this case, too, you need to troubleshoot those corrupt files in order to fix the issue. So, let’s see how:
Step 1 – Firstly, exit the Steam completely.
Step 2 – Now, locate the Steam Directory on your PC. For this, follow this path: Local Disk (C:) > Program Files (x86) > Steam
Step 3 – Open the logs folder and then select the .txt file and search for errors. Further, navigate to the folder named as root.
Step 4 – Now, restart Steam and go to the downloading folder. If you have applied the steps properly, you will get an update option, accept it.
Step 5 – The update will begin, and it will resolve all the issues with Steam.
Method 2 – Retune Winsock
If the error was not due to corrupt files, then executing the netsh winsock reset command will work best for you. This command will recover your PC from all kind of socket errors which occurs while downloading or updating the games.
It is completely safe as it will not lead to any problem with your system. So, to retune Winsock, proceed with the steps below –
Step 1 – Go to the Start menu and search cmd. Right-click on the Command Prompt option and select Run as Administrator.
Step 2 – Command Prompt window will open up with administrative privileges. Now, type netsh winsock reset command and press Enter.
Step 3 – After this, restart your PC to implement the changes.
Now, check whether the error still pops up or it has been resolved.
Method 3 – Reposition Steam Installation and Game Files
Now, let’s discuss an easy and effective way to fix the issue, i.e., repositioning Steam installation and game files. In this step, you will get to know how to change the location of the stream file from the default location to the location you want. So, proceed with these steps –
Step 1 – Firstly, open Steam and go to the Settings menu in the left panel. From the option, select Download.
Step 2 – Now, select Steam Library Folders. You can see the default path of steam files here. Moreover, you can add the path you want by selecting the Add Library Folder option.
Step 3 – Create the new folder path you want and right-click on it to set it as default o that all the files and installations related to Steam will get stored there in the future.
Step 4 – Now, exit Steam completely and browse to your previous Steam folder. Except for the extension file of steam, i.e., Steam.exe and the SteamApps and Userdata folder, delete all the folders.
Step 5 – Further, cut and paste all the Steam folders to the new location you have just created.
Step 6 – Finally, restart Steam, and it will ask you to log in. Login with your account.
Hopefully, this method has helped you in fixing the issue. But, if the issue still persists, there is no need to worry as there are many more solutions to fix the issue. So, move on to the next method.
Method 4 – Disable Antivirus
In many cases, the Third-party antivirus application on your PC may interfere with the Steam app. The quarantine of the Steam app in the blacklist and the issues such as the Steam content file locked arises.
This case is called a false positive. To solve the issue, you need to add Steam to the whitelist of your antivirus software. The disabling process differs for every antivirus application. So, apply the process according to the antivirus you use. Now, follow the instructions below –
McAfee Antivirus
If you are using McAfee Antivirus, then follow these steps to disable it:
Step 1 – On your Windows desktop, right-click the McAfee icon.
Step 2 – From the options, select Change settings and then click the Real-time Scanning option from the menu.
Step 3 – Real-Time Scanning status window will open up. Select the Turn off option.
Further, proceed with the following steps to verify the integrity of game files –
Step 1 – Firstly, restart your PC and then open Steam.
Step 2 – Go to the Library tab. From the Games section, right-click on your game and choose Properties from the menu.
Step 3 – Now, the Properties window will open up. Go to the Local files tab and select the Verify integrity of game files option. The process will start and will take about 15-20 minutes to complete.
Kaspersky AV
Proceed with the steps if you are using Kaspersky Antivirus:
Step 1 – Open the Kaspersky antivirus application. At the bottom of the window, you will find a gear icon. Click on it to open the Settings.
Step 2 – From the left panel, select the Additional and then the Self-Defence option. The Self-Defence settings window will open up, uncheck the Enable Self-Defence option.
Step 3 – Now, click on Continue to complete the process.
Follow the steps to verify the integrity of game files with all the antiviruses.
ESET NOD32
If you are an ESET NOD32 Antivirus user, then these steps are for you:
Step 1 – On your Windows desktop, right-click the ESET NOD32 Antivirus icon.
Step 2 – ESET NOD32 Antivirus window will open up. From the left panel, select the Setup option. From the Setup section, select the Temporarily disable Antivirus and antispyware protection option. Then, select Yes for confirmation.
Step 3 – You will get an option to select the duration of time for which you want to disable the antivirus. Finally, select the duration and click Yes.
Method 5 – Check Disk Scan
If none of the above methods proved to be useful, then scanning the hard disk will be the best option for you to fix the issue. So, try out these steps to scan the hard disk:
Step 1 – Click on the Start menu. In the search tab, type cmd. Right-click on the Command Prompt option. Now, select Run as Administrator from the drop-down menu.
Step 2 – Command Prompt window will open up with administrative rights. Now, type the chkdsk c: /fcommand and press Enter.
Step 3 – When it prompt “Would you like to schedule this volume to be checked the next time the system restarts? (Y/N),”. Answer Yes to that question by pressing the Y key on your keyboard and press Enter.
Restart your computer. After restarting, the disk checking operation should start. Wait until Windows check your disk for errors.
Read Also:
Conclusion
Steam is a very famous gaming application and is loved a lot by its users. But it becomes complicated for the users when the error pops out while updating the games. Here, we have discussed all the possible causes behind this error as well as their respective solution.
Hopefully, you will be able to get out of the error just like all other users who have been benefitted by following these methods. Now, you can enjoy gaming and all other special features by Steam.


