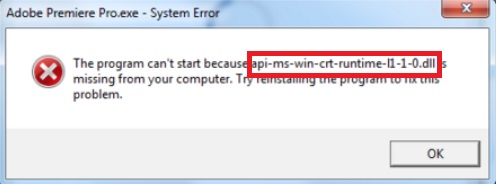
The “api-ms-win-crt-runtime-l1-1-0.dll is missing” error is a common issue encountered by Windows users, often when trying to run or install certain applications. This error message can be perplexing, especially if you’re not familiar with the technical details behind it.
In this comprehensive guide, we will explore the meaning of the “api-ms-win-crt-runtime-l1-1-0.dll is missing” error, its significance, what causes it, and effective solutions to help you resolve this issue and get your Windows system running smoothly.
Understanding the “api-ms-win-crt-runtime-l1-1-0.dll is Missing” Error
Before diving into the details, let’s break down the error message itself:
“api-ms-win-crt-runtime-l1-1-0.dll” is the name of a dynamic link library (DLL) file.
“is missing” indicates that the operating system or application cannot locate this specific DLL file.
In essence, this error occurs when an application or component of the Windows operating system relies on the “api-ms-win-crt-runtime-l1-1-0.dll” file but cannot find it, leading to functionality issues or crashes.
When you encounter the “api-ms-win-crt-runtime-l1-1-0.dll is missing” error, you may experience the following symptoms:
Error Message: The primary symptom is the appearance of an error message explicitly stating that the “api-ms-win-crt-runtime-l1-1-0.dll” is missing.
Application Crashes: The application that requires this DLL file may crash or fail to start.
Inability to Install or Update Software: You may encounter this error when trying to install or update certain software packages, particularly those developed using Visual C++.
Now that we understand the symptoms, let’s explore the potential causes of the “api-ms-win-crt-runtime-l1-1-0.dll is missing” error.
Possible Causes of the Error
To effectively troubleshoot and resolve this error, it’s crucial to identify its underlying causes. Here are some common reasons behind the “api-ms-win-crt-runtime-l1-1-0.dll is missing” error:
Missing or Corrupted DLL File: The most straightforward cause is the absence or corruption of the “api-ms-win-crt-runtime-l1-1-0.dll” file on your system.
Incomplete Windows Updates: This DLL file is distributed as part of the Visual C++ Redistributable for Visual Studio. If your Windows system is missing critical updates or the Visual C++ Redistributable package, you may encounter this error.
Malware or Virus Infection: Malicious software can corrupt or delete system files, including DLL files like “api-ms-win-crt-runtime-l1-1-0.dll.”
Incorrectly Installed Software: If you’ve installed or uninstalled software improperly, it can lead to issues with the DLL files.
Now that we’ve identified the potential causes, let’s explore the solutions to fix the “api-ms-win-crt-runtime-l1-1-0.dll is missing” error:
How To Solve api-ms-win-crt-runtime-l1-1-0.dll is Missing Error
Fortunately, every problem comes with manageable solutions. There are at least four ways you can use to resolve the issue and restore the computer programs to normal functioning. Let us look at some of the solutions for the api-ms-win-crt-runtime-l1-1-0.dll error.
Method 1 – Download The Universal C Runtime
One of the fixes for the error is to Download The Universal C Runtime from the Microsoft Official site. To resolve the error, the user needs to install what iTunes needs specifically. The user can run this update using the common Windows Update.
Let us look at the quick resolution of the problem step wise.
Step 1 – In the first place, go to the Microsoft official webpage and search for Universal C Runtime update. Alternatively, use this link to go to the update directly.
Step 2 – Once the webpage opens, scroll until you find a box incorporating the update files for different versions of windows. Download the version that fits with your computer’s architecture
Step 3 – A new page will open up in the browser; choose the language of your choice and click on ‘Download’.
Step 4 – Let the necessary setup download on your computer. Then, simply follow the live prompts to install the new version on your computer.
Restart the computer so that the new settings can take effect. Check if the api-ms-win-crt-runtime-l1-1-0.dll error persists or not.
Method 2 –Swapping api-ms-win-crt-runtime-l1-1-0.dll File With A Local Copy
As mentioned above, the file resides at various locations around the computer. Keeping this in mind, to fix the System error, one can try to replace the concerned file with some copy of the similar file located at different locations.
In other words, the user can substitute the error possessing file located in the iTunes folder with the same file located elsewhere in the computer. The user simply needs to copy and paste the Dynamic link library (DLL) file in the iTunes folder.
Let us look at some of the quick steps to execute the above-described solution.
Step 1 – To begin with, go to the location mentioned below:
Program Files / Common Files / Apple / Apple Applications Support
Step 2 – Then, navigate the DLL extension file in the Apple Applications Support folder by searching for ‘dll‘ along the search bar. Select all the files that appear on the screen and copy them, along with the api-ms-win-crt-runtime-l1-1-0.dll file
Step 3 – Now go to Local Disk C / Program Files / iTunes.
Step 4 – Once you successfully navigate to this location, lastly paste all the files with the DLL extension there.
That’s it. You are good to go now. Check if the problem persists or not.
The point to note here is that the above solution can prove only to be a temporary fix for the error. Even after doing this, the error can reappear every time apple comes up with a new iTunes update. In this case, if the error reappears use the below-described solutions to resolve the problem permanently.
Method 3 – Installing Visual C++ Redistributable For Visual Studio 2015
Detailed observation confirms that while installing using Windows Update or using any other regular technique to update, the ‘win-crt-runtime-l1-1-0.dll‘ file will not be installed. Moreover, iTunes requires this file to perform its utilities properly. This might be the exact reason for the problem to arise.
Evidently, you can easily resolve this issue. All the user needs to do is to install Visual C+ + Redistributable for Visual Studio 2015 package, in the device.
This software includes the required DLL files that iTunes needs to function properly. Installing this file will bring about necessary DLL files, thereby resolving the api-ms-win-crt-runtime-l1-1-0.dll error.
This simple solution can be resourceful to solve the matter at hand. Install the software on your device and check if the api-ms-win-crt-runtime-l1-1-0.dll error persists or not.
Method 4 – Re-installing An Older Version of iTunes
If the above solutions do not rectify the ‘win-crt-runtime-l1-1-0.dll is missing’ system error, then there is only one possible solution remaining. The user can try to re-install the previous version of iTunes.
The process is a little complex. Here, the user will have to attempt two things. First, you will have to remove all the Apple-related components from the device and secondly, install the iTunes older version. Execute the following steps for the same.
Step 1 – To begin with, push the Windows logo key + R at the same time.
Step 2 – A run dialog box will appear on the screen — type ‘appwiz.cpl’ in the address bar and press enter.
Step 3 – Program and features window will appear on the screen. Now, uninstall all the applications of ‘Apple inc.’ from the device. To uninstall the file, select the file and then press ‘Uninstall.’
Step 4 – Lastly, Restart your computer to proceed further with the installation process.
Step 5 – After completing the above steps, the user now can precede further to downgrade the iTunes version. For that, first of all, open the given link.
Step 6 – Once the webpage opens, scroll to find the section named ‘iTunes Installers‘ to download the previous version. Simply, click the older version’s setup and install it on your device.
Step 7 – Finally, again restart your computer so that the new settings can take effect. Check if the api-ms-win-crt-runtime-l1-1-0.dll error persists or not.
The “api-ms-win-crt-runtime-l1-1-0.dll is missing” error can be frustrating, but with a clear understanding of its causes and the appropriate troubleshooting steps, you can often resolve this issue and maintain a stable and reliable Windows system.
By following these solutions and ensuring your system is up to date, you can efficiently troubleshoot and resolve the “api-ms-win-crt-runtime-l1-1-0.dll is missing” error, ensuring a smooth and trouble-free computing experience.
NVIDIA, a renowned graphics card manufacturer, provides powerful hardware components to enhance gaming and graphics performance on computers.
However, during the installation or update of NVIDIA graphics drivers, users sometimes encounter the “NVIDIA Installer Cannot Continue” error.
This error message can be perplexing and frustrating, but fear not – in this comprehensive guide, we will delve into the meaning of the “NVIDIA Installer Cannot Continue” error, its significance, what causes it, and effective solutions to help you resolve this issue and get your NVIDIA drivers installed or updated smoothly.
Error
Understanding the “NVIDIA Installer Cannot Continue” Error
Before we dive into the details, let’s break down the error message itself:
“NVIDIA Installer” refers to the NVIDIA graphics driver installation program.
“Cannot Continue” indicates that the installer is unable to proceed with the installation or update.
In essence, this error occurs when there is an issue preventing the NVIDIA graphics driver installation program from completing its tasks. It can occur during the initial installation of drivers or when updating to a newer version.
When you encounter the “NVIDIA Installer Cannot Continue” error, you may experience the following symptoms:
Error Message: The primary symptom is the appearance of an error message explicitly stating that the “NVIDIA Installer Cannot Continue.”
Failed Driver Installation: The NVIDIA graphics driver installation or update process fails to complete successfully.
Black Screen or Graphics Issues: In some cases, users may experience a black screen or graphics-related problems after encountering this error.
Now that we understand the symptoms, let’s explore the potential causes of the “NVIDIA Installer Cannot Continue” error.
Possible Causes of the Error
To effectively troubleshoot and resolve this error, it’s crucial to identify its underlying causes. Here are some common reasons behind the “NVIDIA Installer Cannot Continue” error:
Corrupted Installation Files: The installer files required for NVIDIA graphics driver installation may be corrupted or incomplete.
Conflicting Software: Existing software or drivers, particularly antivirus or security software, may conflict with the NVIDIA installer.
Outdated Graphics Drivers: If you’re updating your graphics drivers, having outdated drivers can sometimes cause conflicts with the new installation.
Windows Update Issues: Problems with Windows Update or missing critical updates can affect the NVIDIA installer’s functionality.
Improper Driver Installation: A previous installation or update attempt may not have been completed correctly, leaving behind remnants that interfere with the new installation.
Now that we’ve identified the potential causes, let’s explore the solutions to fix the “NVIDIA Installer Cannot Continue” error:
How to Resolve the NVIDIA Installer Cannot Continue Error
This article contains several strategies for resolving the NVIDIA Installer cannot continue problem. Let’s give these strategies a shot and see if we can address the problem as soon as feasible.
1. Update Graphic Cards Drivers and Enable Them
The first step is to update your drivers and enable your graphics devices. The primary goal should be to update drivers. You can do so by following the instructions below:
Step 1: Open the Start menu and type Control Panel into the search box. Select it by clicking on it.
Step 2: Locate Device Manager in the Control Panel and double-click it.
Step 3: Scroll down to Display Adapters and select it to see more options.
Step 4: Right-click on Nvidia Graphic Card and select Properties. Then select Enable.
Step 5: Select Update Driver Software from the context menu of the NVIDIA graphic card choice.
Step 6: Next, select the option to Search Automatically for Updated Driver Software.
Step 7: Follow the directions exactly as they are written. Graphic cad is now available.
Step 8: Now, click Update Driver Software, but instead of Browse my computer for driver software, select Browse my computer for driver software.
Step 9: Next, select Let me choose from a list of device drivers on my computer from the drop-down menu.
Step 10: When you’re finished, click Next. Restart your computer to see if the problem has been resolved.
2. Task Manager
The next item on the to-do list is to use Task Manager to terminate all NVIDIA processes. The problem can be resolved by deleting and stopping all NVIDIA processes. After that, we’ll repeat the installation process.
The steps below will assist you in doing so:
Step 1: Go to the Start Menu in the first step. Open Task Manager by searching for it in the search menu.
Step 2: Now, look for any and all NVIDIA processes that are running, and once located, click on End process one by one.
Step 3: Try reinstalling drivers after restarting your device.
Step 4: Determine whether the issue is still present. If that doesn’t work, we’ll move on to the next step.
3. Antivirus
The next step is to turn off your antivirus and firewall. Antivirus software might sometimes prevent you from installing NVIDIA on your machine, resulting in the NVIDIA Installer Cannot Continue Error message. With the aid of the following methods, you can disable antivirus and firewall:
Step 1: Open the Start menu and search for Task Manager in the box. To open it, simply click on it.
Step 2: Go to the Processes Tab and find all of the running services.
Step 3: Select all of the services and then click Finish.
Step 4: Restart your computer and attempt again to install NVIDIA. Check to see whether the problem has been resolved. If that’s not the case, we’ll move on to the next option.
Once you’ve completed the installation process successfully, you’re done. Don’t forget to turn on your antivirus software.
4. Manually Enter the Graphic Cards’ Device IDs
The next method on the list is to manually add the Graphic cards’ device IDs. Your system may occasionally detect faulty graphic cards, resulting in the installation process failing with the notice “NVIDIA Installer Cannot Continue Error.”
As a result, manually entering the device ID is recommended. The steps below will assist you in doing so:
Step 1: Go to the Start button in the first step. In the search bar, type Control Panel and click on it to access it.
Step 2: Locate Device Manager in the Control Panel and double-click it.
Step 3: Scroll down to Display Adapters and select it to see more options.
Step 4: Next, right-click on the NVIDIA graphic card and select Properties from the context menu.
Step 5: In the Properties windows, go to the Details tab. In the Property, choose Hardware Ids.
Step 6: Go to www.pcidatabase.com and fill out the form. Click the Search button after entering the obtained Vendor Id and Device Id.
Step 7: You should now have the device’s name and the vendor’s name, which is NVIDIA.
After that, install and update the NVIDIA Driver to the most recent version.
The “NVIDIA Installer Cannot Continue” error can be frustrating, but with a clear understanding of its causes and the appropriate troubleshooting steps, you can often resolve this issue and ensure your NVIDIA graphics drivers are correctly installed or updated.
By following these solutions and maintaining a proactive approach to driver management, you can efficiently troubleshoot and resolve the “NVIDIA Installer Cannot Continue” error, ensuring optimal graphics performance and stability on your system.
Google Chrome, one of the most popular web browsers worldwide, offers users a seamless and efficient browsing experience.
However, like any software, Chrome is not immune to occasional errors, one of which is the “Err_Cache_Miss” error. This error can be perplexing and disruptive, especially if you’re not familiar with its causes and solutions.
In this comprehensive guide, we will explore the meaning of the “Err_Cache_Miss” error, its significance, what causes it, and effective solutions to help you resolve this issue and enjoy uninterrupted browsing on the Chrome browser.
Understanding the Err_Cache_Miss Error
Before delving into the details, let’s break down the error message itself:
“Err_Cache_Miss” is a specific error code that Chrome generates.
“Cache” refers to the browser’s cache, which stores web resources locally to improve page loading times.
“Miss” implies that Chrome failed to find a requested resource in the cache.
In essence, the “Err_Cache_Miss” error occurs when Chrome cannot retrieve a specific web resource from its cache, necessitating a new request to the web server. This error can affect page loading speed and functionality.
When you encounter the “Err_Cache_Miss” error in Chrome, you may experience the following symptoms:
Error Message: The primary symptom is the appearance of an error message explicitly stating “Err_Cache_Miss.”
Web Page Issues: The web page you are trying to access may not load correctly or may display incomplete content.
Slower Page Loading: In some cases, the affected web page may load more slowly than usual due to the need to retrieve resources from the web server.
Now that we understand the symptoms, let’s explore the potential causes of the “Err_Cache_Miss” error.
Possible Causes of the Error
To effectively troubleshoot and resolve this error, it’s crucial to identify its underlying causes. Here are some common reasons behind the “Err_Cache_Miss” error in Chrome:
Cache Corruption: The browser’s cache may become corrupted, preventing Chrome from retrieving cached resources.
Cache Expiry: Cached resources have an expiration date set by the web server. If the cached resource is no longer valid, Chrome will fetch a fresh copy from the server.
Incorrect Website Code: Issues with the website’s code or improper configuration can lead to cache-related errors.
Browser Extensions: Incompatible or malfunctioning Chrome extensions can interfere with the caching process and trigger the error.
JavaScript Errors: JavaScript errors on a web page can disrupt the caching process and cause the “Err_Cache_Miss” error.
Now that we’ve identified the potential causes, let’s explore the solutions to fix the “Err_Cache_Miss” error:
How to Solve Err_Cache_Miss Error on Google Chrome
There are several methods to solve Err_Cache_Miss error; you may follow anyone which is convenient or properly works for you.
Method 1 – Reload the Page
The most obvious thing one can do after this error flashes on the screen is to reload the web page. This step is recommended by chrome itself in the details section when the error page appears. It occurs mainly appears due to problems in the cache system of that respective website.
It may also appear in payment portals, when one goes back to a previous page, chrome asks for complete form resubmission and reloads the page taking one back to the start of that portal.
Method 2 – Clear the Data of the Browser
Since the main reason for the error is related to a cache memory, which includes temporary files, cookies, and storied history.
It is often possible that temporary files and cookies stored in chrome conflicts with the cookies of certain websites or web pages. So it is recommended to clear all the data from the browser.
It can be done by going to the “Settings” then by clicking on “Restore Settings to Their Original Defaults“and selecting the “Reset Settings” option from the dialog box. It will delete all the temporary files and cookies stored in the browser.
Method 3 – Disable One or More Extension in the Web Browser
The wide variety of extensions available on Chrome helps a user to surf and browse the internet with the utmost convenience. But random extensions may result in the occurrence of the ERR_CACHE_MISS error. So, it is advisable to remove all the unwanted extensions from chrome to avoid this error.
All loaded extensions can be accessed by clicking on the respective extension icons situated on the left of the URL bar. It can be uninstalled or disabled by right-clicking on the respective icons and selecting “disable temporarily” or “remove the extension from chrome” option to disable or permanently remove an extension, respectively.
Method 4 – Reset the Network by Using Command Prompt
The error can also be solved via command prompt. To open command prompt type “Command Prompt” in the search bar within the start menu. When the command prompt command box opens up type “ipconfig /release,” then type “ipconfig /all,” followed by “ipconfig /flushdns.”
After typing, it will show “successfully flushed the DNS Resolver cache.” After this type in “ipconfig /renew” followed by “nets int ip set dns” and then “netsh winsock reset.” Then it will ask the user to restart the computer. Restart the computer and then open up the browser to see if the problem got resolved.
Method 5 – Disable Cache in the Web Browser
The ERR_CACHE_MISS error can also be solved by disabling the cache in the web browser. For disabling the cache, click on the “menu button” situated at the top-most right-hand side, beside the URL bar and extension icons. Select on the “Developer tools” from the drop-down list.
This menu can also be opened by pressing Ctrl + Shift + I. After this, the dev window tool appears, from there, select “network” and then click to tick the “disable cache option” box. In this way, the cache n the web browser can be disabled, which may restore the error.
Method 6 – Use the Dev (Developer’s) Tools
The web developer option is used to disable the cache memory in the web browser completely. It has been already discussed in the above point, on how to disable it. Press Ctrl + Shift + I to open the dev tools, and then by pressing on the “F1,” select the “disable cache option” from there refresh the page to see if the error persists.
Method 7 – Reset the Web Browser
The error Conform form resubmission, or Err_Cache_Miss, can be avoided by resetting the Web browser to its default settings. It can be done by going to the “menu icon” in the address bar. After that, click on the “Settings” from the drop-down menu.
Scroll down to the bottom of the “Settings” page to click on the “Advanced” link. Similarly, scroll down to the bottom of the “Advance” page to find the “reset” option. Click on the “reset” button from the pop-up dialog box. This will reset the browser completely to its original settings.
Although a large number of internet users is experiencing the ERR_CACHE_MISS error on a regular basis. The process of restoring the error is straightforward and convenient.
It mainly occurs when certain data stored as cookies, cache memory, or temporary files in a browser cause disruption while accessing a certain site. By following any one of the above Methods, it can surely be resolved.
Who would imagine a day without internet access? So just think that while working or when we about to start work over the net, our operating system refuses to connect to our network. Well, there is no doubt this will be a nightmare.
But, this problem is no imaginary. Over the years, no doubt Windows 10 has become one of the most used operating systems. But just like any other operating system, Windows 10 has got its own problems.
One such is the ‘Windows 10 Can’t Connect To This Network’ error which the users of Windows 10 might come across while using it daily.
Now as we know every problem has got its own solutions. So in this article, we will deal with the ‘Windows 10 Can’t Connect To This Network’ error and the probable causes behind this error interfering with the normal functioning of the user.
Error
The article is surely divided into six sections. The first part will include the fixation of the ‘Windows 10 Can’t Connect To This Network’ error for wireless networks and then the second part will include the solutions to the ‘Windows 10 Can’t Connect To This Network’ error if it shows after the Windows 10 is upgraded.
While the third part will focus on the solutions which will be related to the ‘Windows 10 Can’t Connect To This Network’ error based on the APN.
Moving on we will deal with the ‘Windows 10 Can’t Connect To This Network’ error and the WEP issues followed by the error occurring after the device is released from the Sleep Mode.
And last but not least the article will provide the readers with solutions to the ‘Windows 10 Can’t Connect To This Network’ error in case it happens after the password is changed.
So in this article, the readers will not only get the idea about solving Windows 10 Can’t Connect To This Network error but at the same time will also know about the different scenarios in which this ‘Windows 10 Can’t Connect To This Network’ error can occur.
So let us begin with dealing the situations one by one.
How can I fix Windows 10 Can’t Connect To This Network Error?
Windows 10 Can’t Connect To This Network error is something the Windows 10 users are face to face quite often in their daily lives. So in this article, we have come up with six scenarios where the users are most likely to face the
Windows 10 Can’t Connect To This Network’ error and also the solutions to the below-listed problems.
1. First, we will come with Windows 10 can’t connect to a wireless network followed by the solutions to the listed problems.
2. Secondly with the Windows 10 Can’t Connect To This Network after an upgrade and the solutions to the problem too.
3. Third, we will deal with Windows 10 Can’t Connect To This Network, enter an APN, and try again and the way to resolve it.
4. On the fourth place is the Windows 10 Can’t Connect To This Network and WEP problems and the way the user can get rid of this problem.
5. Fifth place is for Windows 10 Can’t Connect To This Network after waking from Sleep Mode followed by the solution to the issue.
And last, but not least in the sixth place is the Windows 10 Can’t Connect To This Network after password change and the way to resolve the issue.
So let us begin with the first scenario.
Fix – Windows 10 can’t connect to a wireless network
The first probable scenario where the Windows 10 users are most likely to face Windows 10 Can’t Connect To This Network error is while working with wireless networks. So here are the listed solutions to help the users resolve the problem.
Solution 1 – Uninstall your network adapter
The first solution to the Windows 10 Can’t Connect To This Network error while using a wireless network is to uninstall the adapter that the user is working with. Most of the time the adapter consists of some problems for which the user is unable to work normally.
Therefore it is advised to the users that the drivers present in the device need to be uninstalled.
And then eventually re-install them for resolving the problem of the Windows 10 Can’t Connect To This Network error. Here are the steps on how you can implement this solution practically.
Step 1: The first step includes the selection of the Device Manager option from the dialogue list. And in order to bring the list, we are required to press the Windows key + X simultaneously. This brings us the list containing the Device Manager option, which we can select thereafter.
Step 2: After the Device Manager is made to operate there will be an option where we need to choose our network adapter or specifically the network we are longing to connect out operating system with. To select the network adapter we need to right-click on it, once we have located the network adapter from the list of other options, that will be provided to us.
Step 3: Once the network adapter we are longing to connect our operating system with is selected, the user will be provided with a list containing the option of Uninstall. We need to select the Uninstall option from the list that is given below.
Step 4: After the Uninstall option is selected, we will be shown a dialogue box that would contain the message ‘Delete the driver software for this device’. Along with this, there will also be an option called OK, we are required to click on it.
Step 5:Once the user is sure about the uninstallation of the driver from the device, we are required to restart our system. The new driver will be automatically installed by Windows 10.
Once the new driver is installed make sure to check if the Windows 10 Can’t Connect To This Network error persists or not. If not then the user can continue with the normal functioning of the device and if the error still continues to haunt the user then move to the other solutions to resolve the problem.
Solution 2 – Update your network adapter drivers
Another reason that we have predicted for the occurrence of the Windows 10 Can’t Connect To This Network error is the update issue with the adapter that the user is working with.
Often there are chances that the wireless network that the user is working with is facing interference with the normal working because of the outdated driver that is being used.
In order to resolve this problem, the user is advised to download and implement the latest drivers for the adapters that he or she is using. Well, there is nothing much to do for finding the solution.
All that is required for the user to do is to have a device with a stable internet connection so that he or she can reach the official website of the network adapter manufacturer and then download the latest available driver for his or her network adapters.
And thus after the installation of the drivers, the issue with the upgradation of the drivers will be resolved. There are various options for the users to implement for the upgradation of the drives in the system one such way is doing it manually.
In this, the user is required to go to each and every device manufacture’s website for the upgradation of the device drives. Once the user reaches the official websites of each device manufacturer, he or she is required to search on the web to find the perfect driver which will be suitable for the device type as well as the model.
But there are various loopholes in this process. The very first loophole is time. The manual search takes a lot of time and ends up being tedious at times. Not only this but there are always chances of wrong driver installation bu the user, and this might lead to malfunctions in the device and makes things worse.
Therefore to be on the safe side, we should always rely on automatic tools for the up-gradation of Windows driver. One such automated tool is the TweakBit Driver Updater. This tool is one of the most common of its types and at the same is recognized by Microsoft and Norton Antivirus.
After a lot of failed attempts, we have come up with the best and the easiest solution for automatic up-gradation of the drivers. Below are the steps listed. The user is required to follow them and make sure that the Windows 10 can connect to this network error no longer persists.
Step 1: The process begins with the installation of the TweakBit Driver Updater. After the installation is complete there will be scanning of the device the user is working on by the TweakBit Driver Updater program. The TweakBit Driver Updater will check for the outdated drivers in the device automatically. The TweakBit Driver Updater will make sure that the versions of the installed drivers are on par with the latest cloud database versions. In case they are not then new updates will be recommended. This process requires a bit time and thus the user is requested to hold on patience and wait until the scanning is completely done.
Step 2: Once the TweakBit Driver Updater is done with the scanning for outdated drivers in the device, a report consisting of the list of drivers having problems will be shown to the user.
Step 3:The user is required to review the list and make the decision of either individually upgrading the drivers or upgrading all the drivers at the same time.
Step 4: In case the user chooses to update each driver individually then he or she is required to select the ‘Update Driver’ link which will be provided along with the name of the driver.
Or in case the user chooses to update all the drivers at the same time then there is an option for that as well. There will be an ‘Update All’ button present at the bottom. The selection of the ‘Update All’ button will make sure that all the recommended drivers are updated all at once automatically.
Check if Windows 10 Can’t Connect To This Network error persists. If yes then move on with the next solutions.
Solution 3 – Change channel width for your network adapter
One of the most predicted reasons for Windows 10 Can’t Connect To This Network error is the fact that the channel width of the adapter is not in a proper state. So, in this case, it is advised for the user to change the width of the channel.
But in order to follow the adjustments in the channel width, the user is required to follow certain steps. The steps are mentioned in the most convenient way possible for the easy understanding of the users.
Step 1: In the beginning, we are required to familiarize the device with the kind of network the user is using so that the user is required to enter the type of network. So it is required to press Windows + S and an area pops up, where it is required to enter the name of the network.
Step 2: The user will be provided with an option of Network and Sharing Centre from the list of options that will be present on the list.
Step 3:After we have selected the Network and Sharing Centre from the list of options that will be present on the list, we are required to choose the option of Change Adapter Settings.
Step 4: Once we are done with the above-mentioned steps we are required to choose the wireless adapter we are using and select it by right-clicking on it. Then from the menu option, we are required to choose the Properties option and select it.
Step 5: After the selection of the Properties option the user will be introduced with a window. From that window, we will have to move to the Advanced Tab.
Step 6: Once we are inside the Advanced Tab we need to select the 802.11 Channel and change the value of the 802.11 Channel. There are often chances for some users to change the value of the channel to about 20 MegaHertz and find a solution to the error they have been experiencing all this time. But this value may differ from device to device. So it is not necessary that every network will find a solution with the 20 MegaHertz value.
Step 7: In order to save the changes, in the end, the user is required to click the option OK.
Check if Windows 10 Can’t Connect To This Network error persists. If yes then move on with the next solutions.
Solution 4 – Disable IPv6 on your computer and router
One of the other reason to solve the Windows 10 Can’t Connect To This Network error is to disable the IPv6 Network Protocol. However, in order to do so, any Windows 10 user must follow the following steps.
Step 1: First, we need to open the Network and Sharing Centre.
Step 2: Then we have to navigate to the connection section. Once we reach there we are required to locate our own current connection.
Step 3: Once we locate our own current connection we will be provided with a connection status window.
Step 4: In the connection status window there will be an option for Properties. We are required to select that.
Step 5: Once we are done with that we are required to find the Internet Protocol Version 6 (TCP/ IPv6). After we locate the Internet Protocol Version 6 (TCP/ IPv6)we are required to uncheck it.
Step 6:In order to save the changes, in the end, the user is required to click the option OK.
Step 7:To apply the changes that have been made we are required to restart the computer.
In case after the restart, the Windows 10 Can’t Connect To This Network error continues then there might be a situation where the user will have to disable the IPv6 of the router.
Though we cannot disagree with the fact that disabling the IPv6 of the router is not an easy process and might get complicated at times.
However, every router has got its own set of rules and regulations. So it is advised to the user that before disabling the IPv6 of the router the user is required to check the instruction manual and make about the steps that have to be followed are exactly the same as mentioned in the manual.
Solution 5 – Make sure that your adapter and router are using the same security type
The user can protect the data with the help of various security options like WPA2-PSK (AES) and WPA-PSK (AES). To make the network work properly the user should make sure that the router and computer are having the same security type.
The security type of the router can be set using the instructions manual of the router. Once the security type of the router is set one should make sure the same security type is also on the computer.
For doing that the user is required to follow the steps:
Step 1: From the Network Setting Center click on the Manage Wireless Networks.
Step 2: After finding the wireless network, right-click, and choose the option Properties from the menu.
Step 3:From the Security Tab, we can find the Security type. the user is required to select the same security that the router is using.
Step 4:To save the changed click OK.
Solution 6 – Add the connection manually
Step 1: Open the Network and Sharing Center.
Step 2: Select the option Set up a New Connection or Network.
Step 3: Chose the option Manually Connect to a Wireless Network.
Step 4:Click Next.
Step 5: Information such as network name, security key, and security needs to be provided.
Step 6: Click Next to finish the process.
Solution 7 – Change the wireless network mode
The user can change the network mode of the router and the wireless adapter in order to make sure that the network works. To make the network work properly the user should make sure that the router and computer are having the network mode type.
The network mode of the router can be set using the instructions manual of the router. Once the network mode of the router is set one should make sure the network mode type is also on the computer.
For doing that the user is required to follow the steps:
Step 1: From the Network Setting Center click on the Change Adapter Settings.
Step 2: After finding the wireless network, right-click, and choose the option Properties from the menu.
Step 3: From the Properties window, choose the Configure button.
Step 4: Moving to the Advanced Tab we need to select the Wireless Mode.
Step 5: The value of the Wireless Mode needs to be changed. Usually, in most cases the value is 802.11b. However, it may vary from device to device.
Solution 8 – Forget the wireless connection
Step 1: Open the Settings App.
Step 2: Move to the Network and the Internet.
Step 3: Go to the Wi-Fi section.
Step 4: Select the Manage Wi-Fi Settings.
Step 5: Move to Manage known networks.
Step 6: Select the wireless network.
Step 7: Click on Forget.
Step 8: Connect to the same wireless network.
Solution 9 – Disable and enable your wireless connection
Step 1: Move to Network and Sharing Center.
Step 2: Click on the option of Change Adapter Setting.
Step 3: Locate the wireless network. Right-click to select it.
Step 4:Choose Disable.
Step 5: Right-click the same connection again.
Step 6: Choose Enable.
Solution 10 – Install the driver manually
Step 1: Open the Device Manager.
Step 2:Find the network adapter.
Step 3: Right-click and select the option of Update Driver Software.
Step 4:Choose to Browse my computer for driver software.
Step 5:Click on Let me pick from a list of device drivers on my computer.
Step 6:Uncheck the option Show compatible hardware.
Step 7: After finding the network adapter manufacturer, select the driver to be installed.
Step 8: Restart the computer.
Solution 11 – Use ipconfig /release command
Step 1: Press the Windows key + K.
Step 2: Choose the Command Prompt (Admin).
Step 3: Enter ipconfig/release and press Enter. Then do the same with ipconfig/renew.
Step 4:Close the Command Prompt. Reconnect to the network again.
Solution 12 – Change your network adapter
If none of the above-mentioned methods work, then, in that case, the user is advised to change the network adapter. There are situations where a certain network adapter is not compatible with the Windows 10. So the network adapter needs to be replaced with a new model.
Fix – Windows 10 Can’t Connect To This Network after upgrade
Solution 1 – Use Command Prompt
The user might use the command prompt to fix the network issues manually. At times the configuration of the network settings change after the user upgrades his or her Operating System. This leads to Windows 10 Can’t Connect To This Network error.
To fix Windows 10 Can’t Connect To This Network error the user is required to follow these steps:
Step 1: Open command prompt – Press ‘start+R’ which will open the Run dialog box. Type ‘cmd’ and press enter. It will open the command prompt. Else the user might press ‘start+x’ and find command prompt option from the drop-down menu.
Step 2:Enter the commands – “ipconfig /release”, and press enter. This will remove existing network configurations. Then enter the command “ipconfig /renew”, and press enter. This will reset the
network configurations of the user to its default settings.
Step 3:Restart – For changes to take effect, the user must restart the computer.
Solution 2 – Uninstall ESET Smart Security/antivirus software
Sometimes ESET smart security or any other antivirus software might lead to Windows 10 Can’t Connect To This Network error.
In that case, we need to uninstall the software. To uninstall, go through the following steps:
Step 1: Open control panel – Press “start+R” and type control panel in the Run dialog box. Click OK and the user will see the control panel appearing.
Step 2:Select uninstall the program – Click on “Uninstall a program” under category ‘Programs’.
Step 3: Select and uninstall ESET or any other antivirus installed in the system – Just the user will have to go through the list of programs and find ESET security or any antivirus software that is installed in the system.
Then the user is required to go through the installation wizard to uninstall the program from the system. The user might be prompted to give administrator permission. Agree and proceed.
If the user has a password set in the software, then he or she might have to enter it to uninstall. In case the user has forgotten the password, then he will need to use ESET unlock tool.
If a dialog box appears where the user needs to select a reason for uninstalling the program, simply choose any reason and proceed.
Step 4:Restart – restart the computer and check if the network issues are gone.
In case the user is not comfortable using the ESET Smart Security, then, in that case, it is required to uninstall any antivirus software, that the user has been using.
The presence of antivirus software such as BitDefender and Comodo firewall has often been one of the reasons for the Windows 10 Can’t Connect To This Network error.
Solution 3 – Check if IPv4 and IPv6 protocols are enabled
IP address falls under the category of the Network Layer. It is primarily used for communication purposes i.e., the user will need it when he or she wants to connect to the internet, and even if the user wants to connect the device to any other device.
It can be subdivided into 2 more categories,
IPv4
IPv6
If IPv4 or IPv6 are not enabled, the user will not be able to connect to the internet. To check if they are enabled, the user is required to follow these steps:
Step 1: Open control panel – Press “Start +R” and type control panel in the Run dialog box.
Step 2:Open Network and Internet settings – Choose the “Network and Internet” option in the control panel.
Step 3:Change adapter options – Click on “Change adapter options”.
Step 4:Status – Click on “Status”.
Step 5:Details – Click on “Details”.
Step 6: Check – If the user sees an IP address in both IPv4 and IPv6 options, it means both of them are enabled.
Fix – Windows 10 Can’t Connect To This Network, Enter an APN and Try Again
Solution – Enter new Internet APN
WEP or Wired Equivalent Privacy is a security protocol that is specified in Wi-Fi standard 802.11b, which is designed to provide a WLAN with a level of security and privacy comparable to what is usually expected of a wired LAN.
We can create manual connectivity to deal with the problem.
The following steps show how a connection can be manually created:
Step 1: Right-click on the Wireless Network Connection icon on the taskbar.
Step 2: Click and open the Network and Sharing Center.
Step 3: Click on Set up a new connection or network.
Step 4: Click Manually connects to a wireless network.
Step 5: Click next.
Step 6: Enter <the name of the user or the name in which the device is registered > into the Network name field.
Step 7: Select the WEP security type drop-down menu.
Step 8: The encryption type will be WEP by default.
Step 9: Check if the checkbox ‘Start this connection automatically’ is marked or not and mark according to the need of the user. If the user wants to use this connection in the future, mark this box.
Step 10: Enter the security key.
Step 11: Click next.
Step 12: Click on Change connection settings.
Step 13: The connection tab will appear.
Step 14: Click on the security tab which is right next to the Connection tab.
Step 15: Click on settings.
Step 16: Select security type as per the requirement of the user.
Step 17: Click on OK.
Step 18: The connection is created manually.
Fix – Windows 10 Can’t Connect To This Network and WEP problems
Solution – Create connection manually
The creation of the wireless connection manually has already been facialized to the readers. But the part that is left to be dealt with is a connection to the network that uses WEP security.
So in order to do that we need to set a specific kind of security type to the WEP. The following are the steps which the user is required to follow:
Step 1: If the user is looking for the safest form of network security, then it must be made clear that WEP is not the one. So the user is required to change the network security to WPA2 security type.
Step 2: The user will have to change the security type on the router.
Step 3: Once the security type is changed on the router the name should be changed on the device as well.
Fix – Windows 10 Can’t Connect To This Network after waking from Sleep Mode
Solution 1 – Disable IPv6 / Change Power Management settings
The user is advised to check the Power Management Settings of the adapter he or she is using in case the Windows 10 Can’t Connect To This Network error arises once the device is turned on from the Sleep Mode.
In order to execute the process, the user is required to follow the steps mentioned below:
Step 1: The Device Manager option is required to be chosen from where the Network Adapters sections can be obtained.
Step 2: The user will be able to find the wireless adapter he or she has been using. Once located the wireless adapter is needed to be selected. For doing that we are required to right-click on it.
Step 3: A drop-down menu will be provided where we have to choose the Properties option.
Step 4: Once we have chosen the Properties option we are required to select the Power Management Tab.
Step 5: In this Power Management Tab, we are required to uncheck all the options which will allow the computer to turn off the device and save power.
Step 6: The changes that we have made are required to be saved.
Step 7: In a vase, the user is working with any USB devices then the same steps are to follow for the USB devices as well. Once this is done the device will no longer recognize any USB devices.
Solution 2 – Change Power Options
Step 1: To begin with the process we need to start with pressing Windows + S.
Step 2: A drop-down menu appears. Select the option of Power Options from the list.
Step 3: Choosing the Power Options will provide us with the Power Window. The user is required to find his or her required plan.
Step 4: Select the option of Change Plan Settings.
Step 5: The user is required to move to the Change Advanced Power Settings.
Step 6: A list will be provided to us. Select the option of Wireless Adapter Settings.
Step 7: Then navigate to the Power Saving Mode.
Step 8: The user is required to change the setting to the option of Maximum Performance.
Step 9: Save the changes made.
Alternative Way
The above process can be performed in a different way.
Step 1: Move to Power Options.
Step 2: High-Performance power plan option is required to be selected.
Solution 3 – Turn off Connect to Wi-Fi hot-spots
Step 1: Move to Settings.
Step 2: Navigate to the Network and Internet option.
Step 3: After moving into the Wi-Fi option, we need to select the Manage Wi-Fi Settings.
Step 4: Turn off the options Connect to Wi-Fi hotspots and Send Information about Wi-Fi connections to help discover nearby Wi-Fi.
Solution 4 – Disable and enable your network connection / turn on and off Airplane mode
Step 1: Disable and then enable the network connection.
Step 2: The Airplane mode can be turned on and then off again.
Fix – Windows 10 Can’t Connect To This Network after password change
Solution – Forget your network, delete your network from Preferred networks list, check your security type
There are chances to encounter the Windows 10 Can’t Connect To This Network error when the password has been changed recently.
In that case, the forget option for the network is what is advised for the user to sort the Windows 10 Can’t Connect To This Network error.
Follow the steps given below to forget the network from the list of Preferred network lists.
Step 1: After opening the Network and Sharing Center, choose the option of Change Adapter Settings.
Step 2: After locating the wireless adapter, we need to select it by right-clicking on it.
Step 3: A menu will be provided from where choose the options of Properties.
Step 4: Find the Configure button and move to the Wireless Network Tab.
Step 5: Delete the network from the list of Preferred Networks.
Windows 10 Can’t Connect To This Network error is a problem that is faced by many Windows 10 users. So in the article, we made an effort to familiarize the readers with all the possible causes of the error and with their solutions as well.
I hope this article will be beneficial to readers facing Windows 10 that Can’t Connect To This Network error.
Windows 10, a widely used operating system, is known for its user-friendly interface and seamless performance. However, even the most robust systems can encounter errors from time to time.
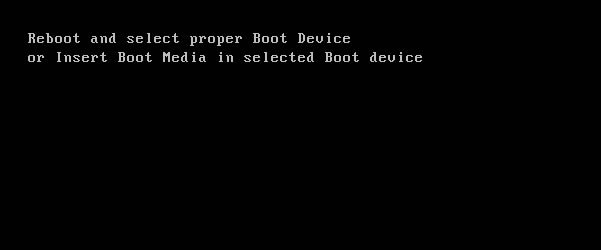
One such error that can leave users perplexed is the “Reboot and Select Proper Boot Device” error.
This error can disrupt your computing experience and may seem daunting, but in this comprehensive guide, we will explain the details of the “Reboot and Select Proper Boot Device” error in Windows 10.
We’ll explore its significance, potential causes, and effective solutions to help you resolve this issue and get your system back up and running.
Understanding the “Reboot and Select Proper Boot Device” Error
The “Reboot and Select Proper Boot Device” error is a critical error message that typically appears during the boot-up process of your computer.
When this error occurs, it means that the system cannot find a valid bootable device from which to load the operating system. In simpler terms, your computer is unable to locate the drive or device that contains the necessary files to start Windows 10.
Before we delve into the causes and solutions, let’s take a look at some common symptoms associated with the “Reboot and Select Proper Boot Device” error:
Error Message: The primary symptom is the appearance of an error message on a black screen that says, “Reboot and Select Proper Boot Device” or a similar variant.
Inability to Boot: Your computer fails to boot into the Windows operating system and becomes unresponsive.
No Boot Menu: You may not see the usual boot menu that allows you to choose the operating system or device to boot from.
Repetitive Rebooting: In some cases, the computer may continuously restart without successfully booting into Windows.
Now that we understand the symptoms, let’s explore the potential causes of the “Reboot and Select Proper Boot Device” error.
Possible Causes of the Error
To effectively troubleshoot and resolve this error, it’s crucial to identify its underlying causes. Here are some common reasons behind the “Reboot and Select Proper Boot Device” error in Windows 10:
Incorrect Boot Order: The BIOS or UEFI settings may have an incorrect boot order, causing the computer to attempt to boot from an invalid device.
Disconnected or Faulty Cables: Loose or damaged cables connecting your hard drive or solid-state drive (SSD) to the motherboard can prevent the system from detecting the boot device.
Corrupted Boot Files: The boot files on your drive may have become corrupted, making it impossible for the computer to start Windows.
Hard Drive or SSD Failure: If your storage device has failed or developed bad sectors, it may not be able to boot the operating system.
Unbootable Media: If you have a non-bootable USB drive, CD/DVD, or other removable media connected to your computer, it can trigger this error.
BIOS/UEFI Configuration Changes: Changes made to BIOS or UEFI settings, such as switching between legacy and UEFI modes, can cause boot-related issues.
Now that we’ve identified the potential causes let’s explore the solutions to fix the “Reboot and Select Proper Boot Device” error:
How to Fix Reboot and Select Proper Boot Device Issue?
As we mentioned above that this error is very common and there can be various possible causes that may give rise to this error, but whatever may be the cause this error can always be fixed so if you are facing this issue there is nothing you should worry about.
Method 1 – Check The Boot Order
The primary and easiest way to solve the “Reboot and Select Proper Boot Device” error is to check your computer’s boot order and make sure that it correctly lists your hard drive as the 1st option.
The following steps will help you in checking your computer’s boot order –
Step 1 – First things first, Restart your computer.
Step 2 – Next, based on your computer manufacturer and computer model, you will need to press the appropriate keys to get into your computer’s BIOS menu. The keys will be shown on your computer screen than first appears. Generally, the keys shown are – Esc, Delete key, F2, F12, or F8.
Step 3 – Select any necessary key depending on your computer, but if your monitor shows several keys then it is advisable to find the key to open BIOS or Setup BIOS menu, and boot order can be changed from there also.
Step 4 – After you get inside the BIOS menu or setup utility, next go to Boot Options and move your operating system to the top of the list so that your hard drive becomes the 1st option.
Step 5 – Save the Settings you made which can be done by pressing the F10 key.
Step 6 –Restart your computer and don’t forget to check if the error still occurs.
Method 2 – Check Hard Drive Health
As we mentioned above, that failed or corrupted operating system or hard drive; thus, you must check your computer’s hard drive if it is failing or has already failed. The steps to check your Computer’s Hard Drive Health are the following –
Step 1 – First you will need to download Easy Recovery Essentials Software you can use this link for it https://neosmart.net/EasyRe/
Step 2 – After you download the software, then the next step is to burn the download ISO image. Make sure to burn it on to a bootable DVD or a spare USB Drive.
Step 3 – Boot into Easy Recovery Essentials and next select the Automated Repair Option.
Step 4 – After that, click on the Continue button and wait for some time so that the Automated Repair process to finish. Once the process has finished, it will inform you about issues in your computer’s Hard Drive or RAM memory if there is any.
Step 5 – Lastly, Restart your computer and see if the error is still there.
Method 3 – Disable Legacy Mode
If your PC have UEFI mode along with Legacy Mode option active, then it might be one of the reasons to cause this Reboot and Select Proper Boot Device error (which we have already mentioned under the possible causes of this error).
In such situations, you can simply disable the Legacy mode to solve this problem. To disable the legacy mode, follow the steps given below –
Step 1 – First, Restart your computer and go into BIOS menu by pressing the necessary keys depending on your computer, i.e., it can be one of these keys “Esc, F2, F12, F8 or Delete Key.”
Step 2 – Once you get into the BIOS menu, you will see a list of options so navigate down or look & select the UEFI/Legacy Boot Priority option and change the Boot Priority to UEFI only.
Step 3 – Then save the settings/changes you made in your computer’s BIOS menu by pressing the F10 key and then exit from UEFI Menu.
Step 4 – At last, don’t forget to restart your computer and check if your computer boots up like usual or is still showing the error.
Method 4 – Using DiskPart
Before we discuss this method, one important thing to note is you will require the Windows OS installation CD or the bootable USB drive. If you have it, then follow the steps given below to solve this error –
Step 1 – At first, insert the Windows installation CD or Bootable USB drive and boot the media.
Step 2 – You will be redirected to a new window, select Troubleshoot Option > click on the Command Prompt Option.
Step 3 – Next, in the command prompt type “DiskPart” and hit the Enter button.
Step 4 – Then type “select disk 0“hit enter. In this, by disk 0 we mean the default disk installed in our computer’s.
Step 5 – To see a full list of disks, type list disk and hit enter button > then type list partition > then type select partition 1 and press enter.
Step 6 – Partition 1 is your computer’s primary partition and after this type active and hit enter button.
This will automatically enable the primary partition of your computer’s operating system or hard drive.
The “Reboot and Select Proper Boot Device” error in Windows 10 can be a daunting issue that prevents your computer from starting. However, with a clear understanding of its causes and the appropriate troubleshooting steps, you can often resolve this error and get your system back to normal.
Remember to regularly check and configure your boot order, ensure cable connections are secure, and maintain a backup of your critical data to minimize the risk of encountering this error in the future.
By following these solutions, you can efficiently troubleshoot and resolve “Reboot and Select Proper Boot Device” errors, ensuring a smooth and trouble-free Windows 10 experience.
Discord, a popular communication platform for gamers and communities, is known for its reliability and ease of use. However, like any software, Discord may encounter errors from time to time, one of which is the “Discord JavaScript Error.” This error can be frustrating and disrupt your Discord experience.
In this comprehensive guide, we will explore the details of the Discord JavaScript Error, its significance, potential causes, and effective solutions to help you resolve this issue and continue enjoying seamless communication on Discord.
Error
Understanding the Discord JavaScript Error
The “Discord JavaScript Error” is an error message that indicates a problem with Discord’s JavaScript code. JavaScript is a programming language used extensively in web development, including Discord’s web-based application.
When this error occurs, it signifies that there is a conflict, issue, or corruption within the JavaScript code that prevents Discord from functioning correctly.
Before we delve into the causes and solutions, let’s take a look at some common symptoms associated with the Discord JavaScript Error:
Error Message: The primary symptom is the appearance of an error message within the Discord application or on your web browser. This message typically contains information about the JavaScript error.
App Crashes: Discord may become unresponsive or crash when the JavaScript error occurs.
Missing Features: Certain features or functions within Discord may not work as expected or may be entirely unavailable.
Slow Performance: The error can lead to a decrease in Discord’s performance, causing lag and delayed responses.
Now that we understand the symptoms, let’s explore the potential causes of the Discord JavaScript Error.
Possible Causes of the Error
To effectively troubleshoot and resolve this error, it’s crucial to identify its underlying causes. Here are some common reasons behind the Discord JavaScript Error:
Browser Compatibility Issues: If you are using Discord in a web browser, compatibility issues with your browser or browser extensions can trigger JavaScript errors.
Corrupted Cache and Cookies: Accumulated cache and cookies in your web browser can sometimes interfere with Discord’s JavaScript code.
Outdated Browser: Using an outdated or unsupported web browser may lead to compatibility issues with Discord’s JavaScript.
Browser Extensions: Some browser extensions or add-ons can conflict with Discord’s JavaScript, causing errors.
Discord Server Issues: Occasionally, Discord server outages or disruptions can result in JavaScript errors when attempting to connect or communicate.
JavaScript Code Conflicts: Third-party scripts or browser settings that affect JavaScript code execution can interfere with Discord.
Network and Connectivity Issues: Unstable or slow internet connections can lead to JavaScript errors when attempting to communicate with Discord’s servers.
Now that we’ve identified the potential causes let’s explore the solutions to fix the Discord JavaScript Error:
Discord Javascript Error: How to Resolve
So, to assist you in this case, I’ve put up these three options that will lead you through the fixation process. Examine them thoroughly.
1. Delete the Discord Files From the LocalAppData and AppData Folders
Discord has a propensity of regularly archiving all non-permanent data on the system. This aids in the execution or may develop as a result of an error.
As a result, in order to ensure that Discord runs smoothly without this Javascript error or any other issues, you should delete the files we just discussed. Use the following guidelines as a guide:
Step 1: Using the Task Manager, close the Discord application. By right-clicking the Taskbar, you can accomplish this. Then select the Discord process and click “End Task.”
Step 2: Now, right-click on the Windows start menu icon. This can be found in the bottom left corner of your screen.
Step 3: Select “Run” from the contextual menu on the screen.
Step 4: In the text area of the “Run” dialogue box, type “percent appdata percent “. After that, press the Run button.
Step 5: In the Windows Explorer tab that is visible to you, look for the “Discord” folder. After that, right-click on the folder. Now, from the contextual list, select Delete.
Step 6: Return to the Start Menu in step 6. One more time, start the Run.
Step 7: In the text area, type ” percent localappdata percent “. Then select “Run.”
Step 8: Go to the “Discord” folder and look for it. Now, get rid of it. To delete the Discord folder, right-click it and select “Delete.”
Step 9: Once the deletion process is complete, open the Discord setup file. To install the application, follow the on-screen directions.
2. Add Discord Installation Files to Antivirus Software’s White List
Some antivirus programmes hide the few Discord files while the installation is in progress. As a result, the installation procedure is marked as incomplete. As a result, the Discord Javascript Error occurs.
The antivirus programme has identified the file “Discord_ voice” as potentially malicious. This is an approximate recovery file for a certain programme. To prevent the antivirus from doing so, you’ll need to add those files to a whitelist.
As an example, we’ll use the Avast antivirus. As a result, take the following steps:
Step 1: Right-click on the Avast icon to launch it. Then select “Open Avast User Interface” from the drop-down menu.
Step 2: From the list of options, select the “Protection” block.
Step 3: Now, from the right side, press the “Virus Chest” button. The files that were previously hidden are now visible.
Step 4: You can tell which files are related since their names start with “discord_” or something similar.
Step 5: While fluttering over the needed files, click on the three-dotted icons that appear. Select “Restore and add an exception” from the drop-down menu.
Step 6: Do the same thing with each file.
Step 7: Once you’ve finished, restart the Discord software installation process.
If you haven’t installed the Discord software and don’t want to get any problems, add the Discord setup file to the Avast exceptions list. As a result, the antivirus will be unable to disguise them throughout the installation process. So, here are the steps to follow:
Step 1: As described in the previous stages, start Avast.
Step 2: From the options, select the “Menu” icon. Then, from the drop-down menu, choose “Settings.”
Step 3: From the left side, select “General.”
Step 4: From the General menu, select “Exceptions” from the options on the left.
Step 5: Select “Add Exception.” Then log in and browse. This will take you to the location where the Discord installer is located.
Step 6: Select “Add Exception” from the drop-down menu.
Step 7: Now, open the Discord setup, which is an executable file.
3. Discord Should be Uninstalled and Reinstalled
When you have Discord installed on your PC, it is very common for an error linked to javascript to occur. As a result, the best method for resolving this issue is to remove Discord and then reinstall it on the machine.
As a result, it is effective. When you use Windows 10’s built-in uninstall application, you’re required to get rid of all the files that were left behind. This improves the installation process.
Follow the instructions below in order:
Step 1: To begin, right-click the Windows Start menu icon. Then, among the options available, select “Search.”
Step 2: Type “Control Panel” into the search text field. Select the first name that appears on your screen.
Step 3: Now, in the Control Panel, select “Uninstall an application” from the drop-down menu. In the sequence, it’s right next to the Programs icon.
Step 4: Select Discord from the drop-down menu. This is the list of programmes. You’ve nailed it. Now, on the top of that presented list, click the “Uninstall” button.
Step 5: When you’ve finished uninstalling, right-click on the Start menu. Then select “Run.”
Step 6: Type “% appdata% ” in the box. Then press the “Run” button.
Step 7: Go to the Discord folder and look for it. Now, get rid of it.
Step 8: Press the “Run” button one more. “% localappdata% ” should be found. Remove the Discord folder from your computer.
Step 9: Go to Discord’s official website to download the most recent version of the programme.
Step 10: Double-click the executable file you saved from the website. Follow the on-screen directions to complete the installation.
Step 11: Once the installation is complete, try to launch the Discord app. I hope you don’t have to deal with this error again.
The Discord JavaScript Error can be an inconvenience when trying to communicate with friends, communities, or fellow gamers. However, with a clear understanding of its causes and the appropriate troubleshooting steps, you can often resolve this error and continue enjoying Discord’s features.
Regularly updating your browser, clearing cache and cookies, and checking for browser extensions are good practices to minimize the risk of encountering JavaScript errors.
By following these solutions, you can efficiently troubleshoot and resolve Discord JavaScript Errors, ensuring uninterrupted and smooth communication on the platform.
Bad Pool Header: Windows 10, Microsoft’s most powerful operating system, allows users to experience a variety of capabilities integrated into a single device.
Users can take advantage of appealing features that are enhanced with the most recent advances and updated software directly from their computing devices. This one-stop shop for all of your tasks is becoming increasingly appealing.
However, no system has completely avoided the tangle of errors that arise for a variety of causes. Even the most recent version of Microsoft’s Windows 10 operating system can have bothersome security issues or basic errors.
Error
The blue screen of death (BSOD) issue is one such irritating error that causes a complete restart of the computer system. It is a fatal condition that the computer device is confronted with, and it is imperative that it be addressed.
The smart operating system now has a capability that allows the user to recognise the source of the issue. The user can then take the appropriate corrective action. Error codes are used by the computer to accomplish this.
“Bad Pool Header” is one such error code, which appears at the bottom of the screen with the blue screen of death (BSOD) error. ‘Your PC ran into a problem it couldn’t manage, and now it needs to restart,’ says a blue screen on the screen.
The system then restarts on its own. The Bad Pool Header issue can be incredibly annoying when it occurs frequently. The Bad Pool Header error code is most commonly seen by Windows 8 and Windows 10 users.
Understanding the Bad Pool Header Error
The “Bad Pool Header” error is a Blue Screen of Death (BSOD) error that occurs in Windows 10. It gets its name from the error message, which typically reads “Your PC ran into a problem and needs to restart.
We’re just collecting some error info, and then we’ll restart for you. (0x00000019) BAD_POOL_HEADER.” When this error appears, it signifies that there is an issue with the pool header, a data structure used by Windows to manage memory allocation.
Common Symptoms of the Error
Before we delve into the causes and solutions, let’s take a look at some common symptoms associated with the Bad Pool Header error:
Blue Screen of Death (BSOD): The primary symptom is the appearance of the BSOD with the error message mentioned above. Windows will automatically restart after displaying this message.
System Crashes: The Bad Pool Header error often leads to system crashes or freezes, causing your computer to become unresponsive.
Loss of Data: In some cases, the error can result in data loss, especially if you were working on unsaved files when the BSOD occurred.
Now that we understand the symptoms, let’s explore the potential causes of the Bad Pool Header error.
Possible Causes of the Error
To effectively troubleshoot and resolve this error, it’s crucial to identify its underlying causes. Here are some common reasons behind the Bad Pool Header error in Windows 10:
Driver Issues: Outdated, incompatible, or corrupted device drivers can lead to memory-related errors like Bad Pool Header.
Memory Problems: Faulty RAM (Random Access Memory) modules or incorrect memory configurations can trigger this error.
Software Conflicts: Incompatible or poorly coded software, including third-party applications and drivers, can interfere with memory management.
Windows Update Problems: Incomplete or interrupted Windows updates can leave your system in an unstable state and cause memory-related errors.
Disk Issues: Problems with your hard drive or SSD (Solid State Drive), such as bad sectors or file system corruption, can lead to memory errors.
Malware Infections: Malicious software can corrupt system files, including those related to memory management.
Overclocking: Overclocking your CPU or RAM beyond their recommended limits can result in instability and memory errors.
Now that we’ve identified the potential causes let’s explore the solutions to fix the Bad Pool Header error:
Methods To Fix Bad Pool Header Error in Windows 10
The Bad Pool Header issue can be caused by a number of factors. More specifically, the error occurs as a result of memory allocation problems in the operating system.
When the user instals new or updated software or hardware into the device, the error becomes a buddy.
It’s possible that the device’s anti-virus software is to blame, or that the error is caused by other factors such as out-of-date device drivers, damaged hardware, bad RAM components, or disc write errors.
Fortunately, every mistake has a solvable solution. The remedies listed below can assist you in resolving the Bad Pool Header problem. Let’s take a quick look at all of the various solutions to the problem.
1. Check the RAM
As previously stated, the issue can be caused by a malfunctioning Ram component in the device. This error causes the computer to enter a fatal state, after which it ceases to function, resulting in the blue screen of death error.
The smart Operating System has a utility that can determine whether or not the device’s RAM is defective. Windows Memory Diagnostic is a free programme that scans your computer for hardware problems. To test your device’s RAM, simply follow the steps below.
Step 1: Start by pressing the Windows logo key. Now, use the search bar to look for ‘Windows Memory Diagnostic.’
Step 2: Select ‘Run as Administrator’ from the context menu of the desktop application ‘Windows Memory Diagnostic.’ To use this tool, you must have administrator privileges.
Step 3: At this point, all you have to do is follow the on-screen prompts. It will diagnose and detect whether or not the device’s RAM stick is defective.
This extensive configuration can be helpful in resolving the blue screen of death problem.
Occasionally, the built-in comprehensive tool fails to detect the underlying cause of the issue. Or it recognises the issue but fails to mention it. The Windows Memory Diagnostic tool may not be the most effective method of detecting defective hardware. As a result, the users have another option.
The user can use any third-party application software to detect and repair the device’s defective RAM. It can increase the likelihood of discovering and correcting an error. For this, we propose that customers install the software ‘Easy Recovery Essentials’ on their devices.
The utility is more appropriate software for repairing damaged hardware and thereby resolving the blue screen of death (BSOD) issue. This link will take you to a page where you can download the software:
https://neosmart.net/EasyRE/
To use the software, follow the steps below.
Step 1: Go to the above link and download the software. Save the software to an external hard disc or a USB flash device.
Step 2: Connect the hard drive / USB to the computer to execute the downloaded software on your device.
Step 3: At this point, you must reboot your device. The software will automatically scan your entire computer for damaged hardware and repair it.
Step 4: Last but not least, Restart your computer to make the changes take effect. Check if the blue screen of death (BSOD) bug persists after using your computer for a while.
2. Update Device Drivers
The Bad Pool Header error is frequently caused by an operating system driver that is defective or wrong. The user can fix the issue by downloading the most recent version of the device drivers, which will replace the buggy one.
To resolve this issue, the user should update all of his or her drivers. The most recent driver version is required in the event that the previous version becomes corrupted. Drivers must undertake the following procedures to update the device:
Step 1: To begin, hold down the Windows logo key and the R key at the same time.
Step 2: On the screen, a run dialogue box will display. Now, in the address box, type ‘devmgmt.msc’ and hit enter.
Step 3: On the screen, the device management window will display. Now you must look through the list of available drivers for drivers with a yellow exclamation mark.
Step 4: To update the driver, right-click on it and select ‘Update driver.’
Step 5: If you’re having trouble updating a driver, you can disable it by selecting ‘Disable device.’
Step 6: Finally, if a device driver is there that is no longer relevant and may be the source of the error, you can delete it by selecting ‘Uninstall device.’
After that, restart your computer to allow the new adjustments to take effect, and then use it for a time. Check to see if the Bad Pool Header issue still exists.
3. Remove Your Anti-Virus Software
Anti-virus software might be overly vigilant, causing the device to malfunction. As a virus, the aggressive programme can function as a catalyst, causing the issue by removing some critical driver.
Disable the anti-virus software on your device for a short period of time. Anti-virus software can have harmful flaws that conflict with existing security software, resulting in a vulnerability.
If disabling the third-party anti-virus software fixes the problem, you should consider replacing it.
The Bad Pool Header error in Windows 10 can be a disruptive and concerning issue. However, with a clear understanding of its causes and the appropriate troubleshooting steps, you can often resolve this error and maintain a stable and reliable operating system.
Regularly updating drivers, checking for hardware issues, and scanning for malware are good practices to minimize the risk of encountering the Bad Pool Header error in the future. By following these solutions, you can efficiently troubleshoot and resolve this error, ensuring a smooth and trouble-free Windows 10 experience.
Microsoft, an American multinational technology firm, had released a series of operating systems, the most recent of which being Windows 10. It was intended to be the successor to Windows 8.1, which had been released two years prior.
When the new Windows 10 operating system series was released, people all over the world began to download it. Within 24 hours, about 14 million individuals had downloaded the series’ update.
However, many customers who attempted to upgrade to Windows 10 encountered a glitch. People complained about difficulties doing various functions, however it was later discovered that the administrator performed all of them.
Error
Understanding “The Requested Operation Requires Elevation” Error
The error message “The requested operation requires elevation” is a security prompt in Windows that occurs when a user or application attempts to perform a task that requires administrative privileges.
In simpler terms, it means that the operation you are trying to execute needs a higher level of authorization than what is currently available to you.
Before we explore the causes and solutions, let’s take a look at some common symptoms associated with the “The Requested Operation Requires Elevation” error:
Error Message: The primary symptom is the appearance of an error message that explicitly states, “The requested operation requires elevation.”
Access Denied: You may be denied access to perform a specific action, such as installing software, modifying system settings, or accessing certain files or folders.
Prompt for Administrator Credentials: In some cases, instead of an outright denial, you may be prompted to enter administrator credentials to proceed.
Now that we understand the symptoms, let’s explore the potential causes of this error.
Possible Causes of the Error
To effectively troubleshoot and resolve this error, it’s crucial to identify its underlying causes. Here are some common reasons behind “The Requested Operation Requires Elevation” error:
Insufficient User Privileges: If you are logged in with a standard user account, you may lack the necessary permissions to perform certain administrative tasks.
User Account Control (UAC) Settings: User Account Control is a Windows security feature that prompts for confirmation or credentials when performing actions that require elevated privileges. If UAC settings are too restrictive, you may encounter this error frequently.
Running an Application as Standard User: When launching an application, especially installers or system utilities, as a standard user, you may encounter this error when the application requires administrator rights.
Corrupted User Profile: A corrupted user profile can lead to unexpected issues, including the elevation error.
Registry or System File Issues: Problems with the Windows registry or system files can interfere with user permissions and cause this error.
Third-Party Software Conflicts: Certain third-party software or security applications may restrict access to system resources, triggering the elevation error.
Now that we’ve identified the potential causes let’s explore the solutions to fix “The Requested Operation Requires Elevation” error:
Methods To Fix The The Requested Operation Requires Elevation Error:
The issue was that whenever the user attempted to do any function on their computer, a notification appeared on their screen with the dialogue “The requested operation needs elevation,” which they could not dismiss.
A user can utilise the following strategies to help himself out of this situation:
1. UAC Relaxation or Disabling (User Account Control)
The UAC [User Account Control] is a mechanism that was created to inform users about the software they were going to run that would attempt to change their device’s settings.
As a result, the problem would arise. To proceed, the user would require administrative access. This happens frequently when a user instals new software or makes a significant modification to their device’s system settings.
The user can resolve Error 740 – The Requested Operation Requires Elevation in their device by altering or disabling the User Account Control’s current behaviour.
Note: When a user disables the UAC, they are exposing their device to a slew of potential security dangers when they download any [questionable] apps.
PS When the user disables UAC, they will see that new software installation notifications are no longer highlighted by their device.
The user must take the following actions in order to achieve their goal:
Step 1: To begin, the user must open a Run Dialog box and input “control” into it. They must then hit Enter and wait for the Control Panel Interface to open before proceeding. [By pressing the Windows key and the R key at the same time, the user can access the Run Dialog box]
Step 2: Once the Control Panel is launched, the user must search for “UAC” [using the search option]. [Or use the search bar.]
Step 3: As a consequence, a list of possibilities will be displayed. Change User Account Control settings must be found and clicked by the user.
Step 4: When the User Account Control Settings option appears, the user must go down the vertical slider and select Never notify.
Step 5: Finally, they must click OK to save the changes.
Step 6: The device would then display a pop-up window asking the user to confirm the modifications. To proceed, the user must click YES.
Step 7: Finally, the user must redo the work they were attempting when the error occurred to determine whether the issue has been resolved.
If this approach does not address the problem, the user can return to the previous procedures.
2. Adding the Domain Admins Group to the Local Administrators Group
The domain administrators’ group is moved to the local administrators’ group in this approach. Many people all over the world have found this to be effective.
Note that this option is only available to those who have registered their device with any domain. Then there’s the question of whether or not they’re having an error problem. Then they can go ahead and use this strategy.
If a user has not yet registered their device by domain, they should look into other options. To begin, each user must create a security group in AD devices and users. For the purpose of describing the processes following. We’ll use IT Appuals as an example of a security group.
The following are the steps to take:
Step 1: The user must first log in to their Domain Controller.
Step 2: The user must then right-click on the Users option to access the option list. The user must select groups and then security from the list. The user must then rename their newly created group. In this case, it would be renamed IT Appuals.
Step 3: Finally, the user must fill in the proper and valid members as directed by the device’s screen.
The user must next build a group policy after completing those procedures. A group policy can be created in one of two ways. The first option is to utilise the default Domain Policy, but we’ll use the second method here, which is to create a new policy called “Local Administrators.”
The instructions below will assist users in doing so:
Step 4: Open the Group Policy Management Console for the user.
Step 5: They must then wait for it to open, after which they must right-click on their OU or domain.
Step 6: From the options on the list that appears on their screen, they must select “Create a GPO and also link it here.”
Step 7: The user must then give their group policy the name Local Administrators.
Step 8: Finally, if the process was successful, the results would be presented on the tree on the user’s device screen.
The user must then change the policy to include the group, in this case [IT Appuals].
Fun fact: Users can add them to the groups that they already have and want to use.
The procedures below will assist users in editing the policy.
Step 9: Expand the Computer Configuration Policies Windows Settings Restricted Groups by right-clicking on the “Local Administrators” policy.
Step 10: Next, the user must navigate to the right slide of the Restricted groups windows, right-click on an empty slot, and then pick “Add Group.”
Step 11: Next, the user must type in the group’s name, “IT Appuals,” and then press OK to save the modifications.
Step 12: After that, the user should click “Add,” which is located under the subheading “This group is a member of:.” “Administrators” and “Remote Desktop Users” must be added by the user.
Step 13: Finally, the user must press OK to save the modifications.
Note: The user simply needs to input the name of the group to which the “IT Appuals” should be added. The GPO in their device will automatically locate and link the group on your PC.
For example, if the user types “NGO,” the GPO will search through all of the device’s local groups until it finds “NGO” and automatically add IT Appuals to that group.
The user must also keep in mind that changing “Members of this group:” will replace the user’s device’s accounts and set the user up during the first phases.
Finally, the user must verify and test whether their procedure was successful.
The steps below will assist the user in determining this:
Step 14: The user must wait 10-15 minutes before logging on to their computer.
Step 15: They must then type “gpupdate /force” and check to see if the local administrators have access to that group.
Step 16: If the user completed all of the preceding steps successfully, the group will now display IT Appuals.
3. Disabling the Built-in Administrator’s Admin Approval Mode
If the user had any issues while updating Windows to the most recent version available. Then there’s a good likelihood that their system enabled the “Admin Approval for Built-in Administrator” option.
This option implies that the user’s device will ask for permission to conduct administrative duties anytime the user wants to do so, even if the user is an administrator themselves.
This is the group’s official policy. As a result, altering the policy may be helpful in resolving the problem.
Note: The tool employed there is extremely powerful, therefore if the user is utilising it for the first time, they must exercise extreme caution.
The user can do so by following the procedures below:
Step 1: To begin, open the Run dialogue box and type “gpedit.msc” followed by Enter. The local group policy editor will be launched as a result of this activity. [By hitting the Windows kay and R keys together, the user can access the Run Dialog box]
Step 2: The user must wait till the activity is properly started. They’ll be able to use the editor after it’s been opened. They must next use the navigation pane on the left side of their screen to follow the path outlined below.
Security Settings > Local Policies > Security Options > Computer Configuration > Windows Settings > Security Settings > Local Policies > Security Options
Step 3: After following the steps above, the user will see a list of options on the left-hand side of their screen. Scroll down until they locate “User Account Control: Admin Approval Mode for the Built-in Administrator account Local Security Setting tab.”
Once the user has located this option, they must double-click it to select its properties from the list that appears.
Step 4: Finally, the user must navigate to the option labelled Disabled on the screen, select it, and then hit OK to implement the adjustments.
Step 5: The user must then restart their devices and verify whether or not their error has been resolved.
4. Changing File Ownership
If a user encounters an error while attempting to access data on their computer or hard drive, they should contact their system administrator. Then they can attempt to change the ownership of the files or folders they want to access.
When a user’s ownership is changed, the computer allows the user to access files and do operations that would typically need administrator privileges.
Users who have their data backed up on an external hard drive and get this error after changing their computer can use this solution. In any of these circumstances, they may change the ownership of the hard drive by right-clicking on it, selecting properties, and then navigating to the security tab.
The user must then complete the standard processes for changing ownership and you will be ready to go.
The user can manually change ownership, or you can add a “change ownership” button to your context menu. These approaches can be used by the user if they encounter this error frequently.
5. Administrator
If the user encounters this error while running a command from the command prompt. Alternatively, if the user is trying to open a system file, it’s possible that the user’s device won’t let them since they don’t have administrator permissions.
The user can solve their problem by following the instructions below.
Step 1: The user can re-launch the application using the Run as administrator option, and then check if the error notice appears on their screen.
Step 2: In the case of the command prompt mentioned before. A box will appear on the user’s screen if they press Windows + S.
Step 3: When the user first sees the box, they must write “command prompt” into it.
Step 4: Right-click on the application command prompt when the search research appears. Then choose “Run as administrator” from the drop-down menu.
Step 5: Finally, the user must verify that they can successfully run commands such as “netstat –anb” and others.
This approach can be used in any application. As it stands, this is a universal answer to a wide range of application-related issues.
This error can be caused by a number of factors, including a lack of privileges, overly strict UAC rules, strict security policy enforcement, third-party meddling, and corrupted Windows accounts.
All the user needs to do is get to the source of the issue. They will discover that the answer to their problem is right at their fingertips, just a little study away, just as they discovered the origin of the problem.
Windows 10, a widely-used operating system, is known for its regular updates that bring new features, improvements, and security enhancements.
However, while updating your system is essential for its optimal performance, you may encounter various update errors, one of which is the 0xC1900200 error.
In this comprehensive guide, we will dive into the details of the 0xC1900200 update error in Windows 10. We’ll explain its significance, potential causes, and effective solutions to help you resolve this issue and keep your Windows 10 system up to date.
Understanding the 0xC1900200 Update Error
The 0xC1900200 error is a Windows Update error code that typically occurs when you attempt to install a new feature update or quality update in Windows 10.
It is part of the Windows Update and servicing errors, and when you encounter it, it signifies that there is an issue preventing the update from being installed successfully.
Before we explore the causes and solutions, let’s take a look at some common symptoms associated with the 0xC1900200 update error:
Error Message: The primary symptom is the appearance of an error message with the code “0xC1900200,” indicating that the update has failed to install.
Failed Update Installation: The update process fails, and you are unable to install the latest feature or quality updates for Windows 10.
System Instability: In some cases, failed updates can lead to system instability, performance issues, or security vulnerabilities.
Now that we understand the symptoms, let’s explore the potential causes of the 0xC1900200 update error.
Possible Causes of the Error
To effectively troubleshoot and resolve this error, it’s crucial to identify its underlying causes. Here are some common reasons behind the 0xC1900200 update error in Windows 10:
Corrupted System Files: System files that are corrupted or damaged can interfere with the update process and lead to errors like 0xC1900200.
Software Conflicts: Third-party software, particularly security software and antivirus programs, can conflict with Windows updates and prevent their successful installation.
Insufficient Disk Space: Lack of free disk space on your system drive (usually C:) can prevent updates from being downloaded and installed.
Windows Update Service Issues: Problems with the Windows Update service, such as corruption or misconfiguration, can lead to update errors.
Pending Updates: If there are pending updates that require a system restart, attempting to install new updates can trigger the 0xC1900200 error.
Outdated Drivers: Outdated or incompatible device drivers can interfere with the update process and result in errors.
Now that we’ve identified the potential causes let’s explore the solutions to fix the 0xC1900200 update error:
How to Solve Update Error Code 0xc1900200 in Windows 10
There are various ways to fix the error of 0xc1900200 that occurs while updating the Windows versions. The 2 of them are as.
Method 1 – Check Minimum Requirements for The Update
It is one of the methods to fix the error of 0xc1900200. This error code often appears if Windows 10is incompatible with the specifications of the system.
Step 1 – Click “Get the Anniversary Update Now” button and after that file will start downloading.
Step 2 – After that, run it and start the update assistant. A window will open named “Update Now” button. Click it and will soon get a compatibility report.
If there is an issue, it will be told which part of our machine is not compatible with Windows 10. Otherwise, everything has green checkmarks, and a Windows update component issues might cause the problem.
Method 2 – Increase the Size of the System Partition Conclusion
It is also one of the methods to fix the error 0xc1900200 that occurs while updating the Windows versions. As it turns out, this particular issue can also occur because there is not enough space on the system reversed partition to complete the operation.
If this scenario is applicable, the operation will fail with the 0xc1900200 error due to space-related issues. Several Windows users that also struggled with this problem have reported that they finally managed to get to the bottom of this issue by using a third-party tool that is capable of expanding the system reversed partition to 350mb.
Most affected users have confirmed that the issue stopped occurring after they completed this operation. At last, we can say there are many ways to solve 0xc1900200 error. The user can opt for any of the ways to fix the error of updating Windows.
Some Additional Solutions to Resolve the Error Easily:
Free Up Disk Space:
Ensure you have sufficient free space on your system drive (usually C:). Delete unnecessary files and applications to create more space for updates.
Check for System File Corruption:
Run the System File Checker (SFC) tool to scan and repair corrupted system files. Open Command Prompt as an administrator and run the following command:
sfc /scannow
Disable Third-Party Antivirus:
Temporarily disable or uninstall third-party antivirus or security software before attempting to install updates. These programs can sometimes block or interfere with Windows updates.
Restart Your Computer:
Before attempting to install updates, make sure your computer is restarted to clear any pending updates that require a reboot.
Update Device Drivers:
Ensure that your device drivers are up to date, especially graphics and network drivers. Visit the manufacturer’s website or use Windows Update to check for driver updates.
Reset Windows Update Components:
If you suspect Windows Update service issues, you can reset its components. Open Command Prompt as an administrator and run the following commands one by one:
Use the built-in Windows Update Troubleshooter to automatically detect and resolve common update-related issues.
Check for Pending Updates:
Manually check for and install any pending updates, including driver updates, before attempting to install the problematic update.
Perform a Clean Boot:
A clean boot can help identify and eliminate software conflicts. Use the System Configuration utility (msconfig) to perform a clean boot, and then try installing the update again.
Use the Media Creation Tool:
If all else fails, you can use the Windows 10 Media Creation Tool to perform an in-place upgrade. This can often resolve update-related issues while preserving your files and applications.
The 0xC1900200 update error in Windows 10 can be frustrating, but with a clear understanding of its causes and the appropriate troubleshooting steps, you can often resolve this issue and keep your system up to date.
By following these solutions and maintaining a proactive approach to system maintenance, you can efficiently troubleshoot and resolve update errors, ensuring a stable and secure Windows 10 experience.
It is evident that YouTube is the best and most used global online video-sharing platform. YouTube has now started operating as one of the Google subsidiaries. This video hosting service; YouTube is running unbeatably since its release that is last 15 years ago in 2005.
YouTube is full of impeccable features and allows its users to not only upload videos and view it but also rate, share, make playlists, report, comment as well as subscribe to other users. YouTube offers a huge spectrum of user-generated and corporate media videos.
Most of the media available on YouTube are free to view but it also includes premium services like the YouTube Premium, YouTube Music, subscription-based channels and film rentals as well.
How To’s
YouTube Step Video technology, Playback, uploading of content, quality and formats, picture quality cut, annotations, live streaming of media, displaying 3D videos, 360-degree videos, reels, community, content accessibility, platforms, localizations contribute to the brilliant features of YouTube and make it the most user-friendly service across the internet.
All these services appear to be more fruitful when it is subordinated by a big-screen like your TV screen.
Now-a-days the market is full of Smart TVs and YouTube enables you to connect its service with your Smart TV giving you an amazing video binge-watching experience.
YouTube.com/Activate is a web link provided by YouTube that allows users to link their YouTube account to a specific device.
This activation process enables users to access their YouTube subscriptions, playlists, and personalized content on their chosen device. The purpose of this activation is to ensure a seamless and personalized YouTube experience across different platforms.
Common Scenarios for YouTube Activation
Before we delve into the activation process, let’s understand the common scenarios where you might need to use YouTube.com/Activate:
Smart TVs: If you own a smart TV and want to watch YouTube videos on the big screen, you will likely need to activate your YouTube account on the TV.
Streaming Media Players: Devices like Roku, Amazon Fire TV, and Apple TV require activation to use the YouTube app effectively.
Gaming Consoles: Popular gaming consoles like Xbox and PlayStation also support YouTube but may require activation.
Set-Top Boxes: Some cable or satellite set-top boxes may have YouTube apps that need activation.
Other Devices: Any device with a YouTube app that supports signing in, such as Blu-ray players and media centers, may require activation.
Now that we understand the scenarios, let’s explore how to activate YouTube on different devices.
How to Activate YouTube using Youtube.com/activate
But if you don’t have a Smart TV there is no need to worry as YouTube can be connected to the normal TV using devices like Roku, Kodi, Xbox, One, PS3 and more. Activating your YouTube on these devices is not at all difficult.
This article will provide you terse methodologies to connect you YouTube to these devices. The article will enlist few external devices through which you can connect your YouTube to your TV set.
Method 1: How to Activate YouTube on Roku
it will only take a couple of minutes to activate YouTube on devices of Roku. After the YouTube is activated on Roku you easily access its content.
What you are only required to do is sign in into your YouTube account via youtube.com/activate and enter the password or digit that Roku must have provided you to connect to your very own YouTube. Implement the following steps in order to activate your YouTube on your any Roku device.
Step 1: Try to connect your Roku device to your TV set. Confirm whether you have an active Wi-Fi connection and sign in to your Roku account.
Step 2: Switch to the Home screen by pressing the Home button on your TV remote. (step to be followed only if you aren’t on the Home screen already).
Step 3: Choose the option Channel Store and press OK on your TV remote.
Step 4: Navigate to the Top Free option and select YouTube then again press OK on your TV remote.
Step 5: Now you will be able to view an option for Add Channel. Go to this option and click OK on your TV remote.
Step 6: Have some patience so that the YouTube channel will be added to your list of channels. In order to cross check this, click on the Home Screen button on your Tv remote and navigate to My Channels. Here you will be able to see the YouTube channel in your list of channels.
Step 7: Select the YouTube channel and press OK to open it.
Step 8: On the left-hand side panel of the YouTube channel you will see a gear like icon. Press this icon.
Step 9: Choose the sign-in option here and enter your account information. (google/ YouTube account).
Step 10: Roku will thereby provide you an 8-digit passcode. Note down this passcode.
Step 11: From your PC/ phone go to com/activate to activate your account.
Step 12: Here, enter your Account information and click on sign-in.
Step 13: Enter the 8-digit passcode that Roku had previously provided you.
Step 14: You might now see an option; Allow access, click on it.
Hereby, your YouTube channel is activated on your Roku through the youtube.com/activate. Now you will be allowed to access you YouTube on the big screen without any trouble.
Method 2: How to Activate YouTube on Smart TVs
This task is pretty simple but you have to make sure that your model supports the YouTube App. You might not be able to view the YouTube App on your TV if by chance the TV software doesn’t support the YouTube pre-requisites.
The steps to activate YouTube on your Smart TV is very much similar to the steps followed to activate on YouTube on Roku devices. After 2013, the Smart TV launched a brand-new YouTube app built-in structure.
The Smart TVs manufactured during or after 2013 are most likely to have and support the YouTube app set-up.
Follow the given steps to activate YouTube on your Smart TV and have a marvellous experience.
Step 1: Navigate and open your YouTube app on your Smart TV.
Step 2: You will find a gear like icon on the left-hand side of the screen. Click on this icon and click on the option sign-in.
Step 3: Here, it will provide you an 8-digit passcode. Note it or keep the screen open.
Step 4: From your PC/ phone go to com/activate to activate your account.
Step 5: Here, enter your Account information and click on sign-in.
Step 6: Enter the passcode that had been previously provided you.
Step 7: You might now see an option; Allow access, click on it.
Now for the smart Tv models that are older, they will mostly have the former version of YouTube app. But you can use this app to activate your YouTube account and watch your YouTube channels just you have to do is, follow the given steps.
Step 1: Navigate and open the YouTube app on your Smart Tv.
Step 2: From the menu situated on the left-hand side of the screen click on Sign-in.
Step 3: Here, it will provide you an 8-digit passcode. Note it or keep the screen open.
Step 4: From your PC/ phone go to com/activate to activate your account.
Step 5: Here, enter your Account information and click on sign-in.
Step 6: Enter the passcode that had been previously provided you.
Step 7: You might now see an option; Allow access, click on it.
Hereby, you will find YouTube to be activated on your Smart Tv screen. You will now be able to access and browse the YouTube content from your Smart TV screen. Again, a gentle reminder, if you are unable to perform the steps as mentioned above through youtube.com/activate then check if your model supports the YouTube app software.
Method 3: How to Activate YouTube on PlayStation 3
Activating YouTube on your PlayStation 3 is simple, all you have to do is navigate and open your YouTube app on your PlayStation 3.
And if you previously might not have signed-in your account then enter your Google account information and sign-in. once you are done you just have to enter the code by visiting the youtube.com/navigate site.
Here is the step-by-step information that will help you activate your YouTube account on your very own PlayStation 3.
Step 1: Download and install the YouTube app from your PlayStation store. If you already have it installed just open it.
Step 2: Click on the gear like icon which will take you to the Settings.
Step 3: Click on sign-in and press X.
Step 4: The app will now assign you a code. Note it or keep the screen open.
Step 5: From your PC/ phone go to com/activate to activate your account.
Step 6: Here, enter your Account information and click on sign-in.
Step 7: Enter the passcode that PlayStation 3 had previously provided you.
Step 8: You might now see an option; Allow access, click on it.
Your YouTube will be activated and you will be now able to access all its features easily.
Method 4: How to Activate YouTube on Xbox One
Activating your YouTube account on Xbox One is same as the steps required to be followed for PlayStation 3. Here’ Step a terse information about the account activation procedure. Navigate and open your YouTube app on your Xbox One.
And if you previously might not have signed-in your account then enter your Google account information and sign-in. Once you are done you just have to enter the code by visiting the youtube.com/navigate site.
Here you will find the steps to activate your YouTube account on Xbox One and enjoy:
Step 1: Click on sign in.
Step 2: Click on the gear like icon which will take you to the Settings.
Step 3: Click on sign-in and press X.
Step 4: The app will now assign you a code. Note it or keep the screen open.
Step 5: From your PC/ phone go to com/activate to activate your account.
Step 6: Here, enter your Account information and click on sign-in.
Step 7: Enter the passcode that Xbox One had previously provided you.
Step 8: You might now see an option; Allow access, click on it.
This way you will now be able to access your YouTube account through the Xbox One.
Method 5: How to Activate YouTube on Kodi
Kodi is software that can be installed on your Smart TV and is basically used to play media. Activating YouTube on Kodi is a bit tricky procedure but if all the steps are followed properly, you can activate your account in no time.
You have to use the same link that you used before, youtube.com/activate and follow some additional steps.
Here you go with the detailed steps to activate your YouTube account on Kodi:
Step 1: Navigate to the settings.
Step 2: Take the cursor and click on Add-ons.
Step 3: Choose install from get Add-ons/ Repository.
Step 4: Choose Kodi Add-on Repository
Step 5: Here, Choose Video Add-ons
Step 6: Navigate and choose YouTube
Step 7: Click on Install
Step 8: Once it gets installed, navigate to Videos and click on Add-ons
Step 9: Choose and open YouTube
Step 10: Click on Sign in
Step 11: The Add-on will provide you a code. Note it down or don’t close the screen
Step 12: From your PC/ phone go to com/activate to activate your account.
Step 13: If you are having trouble signing in from the above link, go here https://accounts.google.com/o/oauth2/device/usercode?enable_delegation&pageId=none and now enter your code.
Step 14: Here, enter your Account information and click on sign-in.
Step 15: Enter the passcode that YouTube app had previously provided you and proceed.
Step 16: You might now see an option; Allow access, click on it.
Method 6: How to Activate YouTube on Apple Tv
The process of activating YouTube on your Apple TV is very similar to the process followed in the previous few devices. It is straight-forward process that expects you to visit the youtube.com/activate and enter the passcode.
Follow the given steps to activate your YouTube account on Apple TV:
Step 1: Click on sign in.
Step 2: Click on the gear like icon which will take you to the Settings.
Step 3: Click on sign-in.
Step 4: The app will now assign you a code. Note it or keep the screen open.
Step 5: From your PC/ phone go to com/activate to activate your account.
Step 6: Here, enter your Account information and click on sign-in.
Step 7: You might get a pop-up selection screen. Choose your Google+ account or the page that is related to the YouTube channel.
Step 8: Enter the passcode that YouTube app had previously provided you and proceed.
Step 9: You might now see an option; Allow access, click on it.
Method 7: How to Activate YouTube on Samsung Tv
The steps again are same as other devices that are quite simple. You should take a note that some Samsung TV models do not have the YouTube app.
So you can try and install it otherwise; you will be unable to perform and execute the youtube.com/activate steps. Follow the steps given below:
Step 1: Click on sign in.
Step 2: Click on the gear like icon which will take you to the Settings.
Step 3: Click on sign-in.
Step 4: The app will now assign you a code. Note it or keep the screen open.
Step 5: From your PC/ phone go to com/activate to activate your account.
Step 6: enter your Account information and click on sign-in.
Step 7: Enter the passcode that YouTube app had previously provided you and proceed.
Step 8: You might now see an option; Allow access, click on it.
YouTube.com/Activate is a vital tool that allows you to seamlessly access your YouTube account and personalized content on various devices, including smart TVs, streaming media players, gaming consoles, and more.
By following the step-by-step activation process, you can enjoy your favorite YouTube videos on the big screen and across different platforms without hassle.
Whether you’re binge-watching your favorite channels or exploring new content, activating YouTube on your preferred device ensures an enjoyable viewing experience.
This article will help you activate your YouTube account using the youtube.com/activate site.