Home Blog Page 6

Apple Mobile Device USB Driver Missing [Solved]

The issue with the name “Apple Mobile Device USB Driver Missing” arises when the drivers required in the iPhone for always attaching the device to the respective Windows are missing. These drivers are known to act as the main mediator for both the hardware and the software part. Thus, results in the smooth functioning of the system.

In case if it is not present in the system, the operating system lacks behind in the interaction phase which is carried out with the device itself. Every device that exists must have personalized drivers. Only after installing the drivers, you are supposed to continue with the data. For resolving this issue, first, go for installing the Apple device drivers. This should be done in manual mode. Verify if this particular step helps you or not.

Causes of Apple Mobile Device USB Driver Missing

Apple mobile device USB driver is not visible to us: The issue of this invisibility arises only at the time when your system is not very capable to show up the drivers which all are associated with Apple and also attached to the computer.

Apple mobile device USB driver lacks in device manager: The error comes as a signal to make users know about the Apple device which is not detectable at the device manager while they were trying to establish a connection with the computer. Generally, it signals about the bad connection establishment between your computer and the Apple device.

Apple Mobile Device Service is missing: All the application and software associated with Apple has its self inbuilt service provider for Windows. These are utilized to control the software. If it shows any kind of malfunction in the USB driver, the features have a problem to even give a start.

How to Fix Apple Mobile Device USB Driver Missing Error

Solution 1: Checking Connection of Apple Device

As we begin to operate on the device manager and manually install the driver, find whether the Apple device and your system is connected or not. If the driver or the device is not showing up then it means that the attachment has not been set up. Check the data cables for whether they are transmitting the data properly or whether it is working properly or not. In a few of the reports, it has been observed that the cables take up the charging process so smoothly but are unable to transmit the data in the same smooth way.

Thus, end up by not providing you the backing- up feature for your iPhone. You need to modify the port when the cable is doing its job. It should be done where your respective is attached to your system. You can also go for an option of un- attaching the cable and then reattaching it with the system. Look for whether the device is visible or not.

Solution 2: Reinstalling Apple Mobile Device USB Driver

The reinstallation process always works in the case where the system is already attached but the Apple device is still not recognized by the system. Here, we have mentioned the solutions to two procedures. Yes, the download through Apple for the iTunes as well as the download through Microsoft Store. It totally depends on your choice. Go according to the guidelines provided.

In case you decided to carry on the download process for the iTunes through Microsoft Store, follow these guidelines as mentioned here:

Step 1: Remove each and every connection of the Apple device away from the system. You can do this by detaching the cable.

Step 2: You need to open the lock of your Apple device. There the home screen opens- up. Try to establish a connection of your Apple device once again along with your device screen wide open. In case you find the iTunes to pop- up, we advise you to close it at once. Always ensure that the device you are using is in an open state as it needs to be, for the entire process.

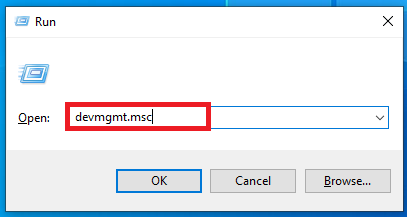
Step 3: To launch the Run dialogue box, just hit the Windows + R. Then type “devmgmt.msc” in the text field. Now hit Enter.

Step 4: The Device manager opens up in front of you. So, provide expansion to the Portables devices. Then you have to right-click at the Apple device option that you are using. Now, hit the Update driver.

Step 5: You have the topmost option as “Search automatically for updated driver software”. Choose it as your choice.

Step 6: Now, that you have installed the upgraded version of the driver, follow this sequence as your next move: Settings à Update and security à Windows Update. Always keep your Windows as the updated one. At- least try to meet this particular criterion.

Step 7: Start the iTunes that you installed. Look for whether the issue still persists or not.

In case you are proceeding with the downloading through Apple, please move on with these steps as mentioned:

Step 1: Detach all the connections of the Apple device you are using from the system. You can unplug those cables.

Step 2: Open the Apple device. On your home page screen, establish the connection between your system and the Apple device. In case you find the iTunes to pop- up, we advise you to close it for once. Always ensure that the device you are using is in an open state as it needs to be, for the entire process.

Step 3: To launch the Run dialogue box, just hit the Windows + R. Then type “% ProgramFiles % \Common Files\ Apple \Mobile Device Support \Drivers”. Now hit Enter.

Step 4: The number of files will appear when the file explorer is visible on the screen. Just right click at inf along with usbaapl64.inf. Hit on Install.

Step 5: It is important that all your files must have “.inf” as their extension. Proceed to install the steps mentioned above.

Step 6: Remove the connection of your device after you have installed it. Then connect it again. Begin with iTunes and look for whether the issue resolved or not.

Solution 3: Restarting the Apple Mobile Device Service

Windows provides a service that executes the Apple drivers all over functioning. This service also supervises the module as well as ensures that every function is carried out in a proper manner in your Apple device by eliminating every issue. This service supplies the interface required to your Apple mobile devices. In case the service is the reason behind this issue, then you must go with the option to restart your set- up. Look for whether the issue persists. For this procedure, follow these steps for your guidance:

Step 1: To launch the Run dialogue box, just hit the Windows + R. Then type “services.msc” in its provided text file. Hit Enter.

Step 2: You have reached the services. Find the service named “Apple mobile device Service”. Provide a right hit on it and then choose Properties.

Step 3: First click on Stop to end the service, then hit on Start. Always set the startup type to Automatic.

Step 4: Again, try to attach the Apple device to your system. Then start iTunes. Look for whether the problem still exists or not.

Conclusion

All the solutions are well qualified. In case the issue still exists, just delete the iTunes software from the device as well as the device with taking the Solution 1 into consideration. Then install the both again. Set up the attachment for one more time. The step just taken by you makes the by-default drivers get installed which are related to the device. Again, if the process fails to remove the error, then give an attempt to attach the Apple device to some other system. You can also opt for an option to modify the port for your system.

Update Error Code 0x80070002 in Windows [Solved]

Update Error Code 0x80070002 in Windows

You might encounter Error Code 0x80070002 while updating the Windows, don’t worry. Most of the time, missing files and deleting the files led to Update Error Code 0x80070002. The virus is mainly responsible for the deleting as well as corrupting the file, but there are many other factors too. Which result of the Windows Update Error 0x80070002.

Update Error Code 0x80070002 in Windows

How to Fix Update Error Code 0x80070002 in Windows 10

Here I am going to show you a couple of working and efficient methods to fix Error Code 0x80070002. Here are the listed of all methods we will discuss in this article.

Method 1 – Try Windows Update Troubleshooter

Launching a troubleshooter is always a wise method to fix the Windows update error. Here I am going to show you some steps to fix the Windows update error by using windows troubleshooter.

Step 1 – Press the Windows button in your keyboard in the search box, type the web browser you want.

Step 2 – Then, right-click on it, the web browser opens.

Step 3 – On the search engine box, type “troubleshooter” and download it. It is better to download the troubleshooter from a genuine website, e.g., Microsoft.

Step 4 – Before downloading, check the Windows version and bits version in your PC and download the troubleshooter according to the Windows version and bits version.

Step 5 – Run the file which you have to download.

Step 6 – Then click on the Windows update and press on the “Next” button

Step 7 – Don’t interrupt the process until it finished.

Restart is mandatory to lead a positive result.

Method 2 – Check the Date and Time Settings

Sometimes Incorrect date and timing led to this error. As we all know unsynchronized of date and timing led to the distortion of the update of the Windows whereas if the update is possible then this error popup to fix this error all you need to do is to fix the correct timing and for this, I am going to show you some of the simple steps to do so:

Step 1 – On your display, clicks on the bottom right date and time option.

Step 2 – Then, sub clicks on the change date and time settings.

Step 3 – Date and time option appears with 3 columns i.e. Date and column, Additional clocks, and Internet time.

Step 4 – Click on the Change time zone option, which appears on the Date and time option.

Step 5 – Click on the 3rd column (Internet time) and then click on the change settings.

Step 6 – Click on the box next to Synchronize with an Internet time server, and then click on the update option.

Step 7 – Further, click on the OK button.

Step 8 – Make sure to restart your laptop/computer and then update the Windows again.

Check your date and timing again by the following method shown below:

Step 1 – Press the Windows button on the search box, type “cmd” and press enter.

Step 2 – and then right-click on the cmd and click on the “run as administrator”.

Step 3 – Check time, date and w32tm/resync in the window

Step 4 – Recheck your date and time, If the date and time are not correct the type the date and time.

Then again, restart after making the changes to fix the Error Code 0x80070002.

Method 3 – Modify Registry Editor

I am going to show you some steps to fix the Windows update issue here are the list of some simple steps below:

Step 1 – Press the Windows + R key altogether; the Run box will appear on the bottom lefts side of the display.

Step 2 – Type “regedit” in the run and press enter option.

Step 3 – Make sure to approve the request from the administration.

Step 4 – Then go to the given address and right-click on it.

HKEY_LOCAL_MACHINE\SOFTWARE\Microsoft\Windows\CurrentVersion\WindowsUpdate\OSUpgrade

Step 5 – Click on the OSUpgrade key, and in the options, sub click on the DWORD (32-bit) Value.

Step 6 – The above steps have created the Newly value, then right-click on it to modify it.

Step 7 – Change the new value name as ALLOWOSUpgrade, then change the Value data as 1, then select hexadecimal in the Base tab after doing all these changes, click OK button.

Method 4 – Modify the Windows Update Installation Files

The main reason to occur this error is due to the system update process fail, due to driver and missing /corrupting of files. We can modify files and folders to check files and folders are installed successfully; here are some steps to avoid this error.

The method is divided into three parts:

  • Disable the Windows update service
  • Delete the software distribution folder
  • Re-enable the Windows update service

Disable the Windows Update Service

Step 1 – Press Windows + R keys altogether in your keyboard

Step 2 – Run appears on the bottom left side corner of the display.

Step 3 – Type services.msc in the run and click OK button.

Step 4 – Menu appears to search Windows update on the list as soon you find it double click on it.

Step 5 – Then, 4 column option appears i.e., general, log on, Recovery, Dependencies on the first tab (general), change the startup type to automatic.

Step 6 – Then click on the OK button and apply button

Step 7 – Restart your PC to see changes.

Delete the Software Distribution Folder

Step 1 – Press the Windows button and click on the computer option

Step 2 – Find the driver where your Windows is installed

Step 3 – Then on the Windows folder go to the software distribution

Step 4 – Delete the folder name of the software distribution and close all the open tab.

Re-enable the Windows Update Service

Step 1 – Press Windows + R keys altogether in your keyboard

Step 2 – Run appears on the bottom left side corner of the display.

Step 3 – Type services.msc in the run and click OK button.

Step 4 – Menu appears to search Windows update on the list as soon you find it double click on it.

Step 5 – Menu appears to click on the start option.

The update service will start, then make sure to restart your PC to see the changes.


Read More:


Conclusion

Here are the all possible, working and efficient method, hope one of the methods, as shown above, helps you to fix the Windows Update Error 0x80070002.

How to Fix USB Ports Not Working [Solved]

USB Ports Not Working

Sometimes when you plug in your USB in the USB port of your laptop, suddenly you received a notification on your screen USB device not recognized, or sometimes there is no response of USB on your laptop. This can be very irritating when all these happen without any reason. But keep calm as USB Ports Not Working is a normal issue and can be fixed easily.

How to Fix USB Ports Not Working

Now let’s have a look at how you can fix the issue of USB Ports not working on the laptop.

Method 1 – Restart Your PC

Most of the time, a simple step of restarting your device can fix some minor and major issues. You just have to remove your USB device from the laptop and after some minutes, restart your laptop. Now put your USB again in the USB slot of your laptop and check if your issue has solved.

If the problem is solved then congratulations but if not then move on to the next solution.

Method 2 – Make Sure USB Ports Are Not Damaged

Examine the USB port of your laptop in order to find out if there is something stuck in the port. If you find out something then remove it with care.

In case you find out that port is looking alright then there must be not any problems inside it. Now put your USB inside the port and move it slightly up and down. If it is moving freely then your post must have a problem.

Method 3 – Check Device Problems

If you have a second laptop available to you at the time then put your USB in it’s USB port. If it is working on the second laptop, it means your USB has an issue. But if it is not working even in that port, then there must be an issue in your USB device. In case, you don’t have any other laptop but you have another USB then you can try putting it.

Method 4 – Adjust Power Management

Your laptop has a feature to turn off your USB controllers when you are not using them in order to save power. It again turns ON when you need to work on it. But sometimes due to some errors, the Windows becomes unable to turn your USB controller ON.

Follow the steps mentioned below in order to set the Power Management:

Step 1 – First of all you have to invoke your Run Box and to do so you have to look for the Windows key and R key present on your keyboard and press them together. Now a box will appear in which you have to put the command devmgmt.msc and click on OK.

Step 2 – Now a drop-down list will appear on your screen. In order to expand it you have to click on the Device Manager window and then scroll down and double click on the option Universal Serial Bus Controllers.

Step 3 – A list will be appeared from which you have to click on the option USB Root Hub and then click on Properties.

Step 4 – Now you have to select the tab Power Management. Then you have to untick the option Allow the computer to turn off this device to save power and then select the OK option.

Step 5 – Now you have to perform the same steps for 3-4 times for all the USB devices present in your USB Serial Bus Controllers.

After performing the steps you have to take a look that your USB ports are now working properly or not. If the problem is solved then congratulations but if not then move on to the next solution.

Method 5 – Reinstall USB Drivers

In order to fix the issue USB port not working, you can uninstall all the USB devices present in your laptop with the help of Device Manager. And then your Window will install them again after rebooting the device.

To do so you have to follow the below-mentioned steps:

Step 1 – First of all, you have to invoke your Run Box, and to do so you have to look for the Windows key and R key present on your keyboard and press them together. Now a box will appear in which you have to put the command devmgmt.msc and click on OK.

Step 2 – Now a drop-down list will appear on your screen. In order to expand it you have to click on the Device Manager window and then scroll down and double click on the option Universal Serial Bus Controllers.

Step 3 – A list will be appeared from which you have to click on the option USB Root Hub and then click on the Uninstall device.

Step 4 – Now you have to perform the same steps for 3-4 times for all the USB devices present in your USB Serial Bus Controllers.

Step 5 – Finally, reboot your laptop and have a look at whether your issue has fixed or not.

Method 6 – Disable USB Selective Suspend

In case, you are still facing the USB Ports Not Working issue. You can now Disable USB Selective Suspend. It helps in preventing your device from the useless use of powers when not in need. It does this all by changing some USB ports in the state of low – power. You can try to disable this feature in order to get rid of the issue.

Step 1 – Open the Search bar by following the above methods and then in that box, type choose a power plan. Then select the option Choose a power plan.

Step 2 – Now select the option Change plan settings which are present just after the plan option where you currently are.

Step 3 – Now select the option change advanced power settings.

Step 4 – Now you have to double click on both one after the other USB settings and USB selective suspects.

Note: In case you are performing all this on your laptop, you have to click on the battery and then disable it by using the menu Dropbox.

Step 5 – Now a drop-down list will appear on your screen. In order to expand it, you have to click on the Enabled option. Now Save all the changes that you made by clicking on Apply and OK.

Have a look if your problem is solved successfully.

Method 7 – Remove Your Laptop Battery

If the USB Ports not working problem is still stuck with your USB ports then you can try fixing this issue by removing the battery of your laptop. This solution has resulted in very effectively as reported by a lot of users. To do so you just have to remove the battery of your laptop and press the power button for about 30-40 seconds.

This process will help in discharging your capacitors. A lot of users found it more effective to leave you switched off the laptop after removing the battery for a full night. It will surely help you to solve the USB Ports Not Working issue.


Read More:


Conclusion

We have provided you with some solutions on how to fix the USB ports not working on a laptop. We recommend you follow the solution step by step as we provided in the article. We are pretty sure you will be able to solve the issue but if it still not then contact any specialist.

DNS_Probe_Finished_NXDomain Error in Chrome [Solved]

DNS_Probe_Finished_NXDomain Error in Chrome

DNS_PROBE_FINISHED_NXDOMAIN happens mostly because of the misconfiguration of DNS settings in the user’s internet connection network. The user gets interrupted during browsing, and that’s when they encounter this error. The user’s window screen displays “This site can’t be reached” along with an error code saying “DNS_PROBE_FINISHED_NXDOMAIN”. But with time, many solutions came up to eradicate this problem. There are many solutions to help online users to overcome this problem themselves.

DNS_Probe_Finished_NXDomain Error in Chrome

How to Fix DNS_Probe_Finished_NXDomain in Chrome

DNS_Probe_Finished_NXDomain error has been faced the most by the users using Windows 10, Windows 8.1, Windows 7, and even in Mac or Android Phones and with Browser and maybe sometimes in other internet browsers as well. There are those few methods and steps that would help and guide some users through the solutions.

Method 1 – Change the TCP/IP4 Proxy Settings

Sometimes changing the network settings mostly of TCP/IP4 Proxy settings might help in solving the DNS_PROBE_FINISHED_NXDOMAIN error.

The following steps would help the user do follow the method correctly:

Step 1 – Firstly, the user has right-clicked on the windows and select the network connections option in it.

Step 2 – After that, the user has to right-click on the Active Network that the user is using at the time.

Step 3 – Then they have to find and select the Internet Protocol Version 4 (TCP/IPv4).

Step 4 – After that, a new window will open up where the user has to check and change the use and alternate the DNS addresses to preferred ones below, and then the user has to press Enter.

Preferred DNS Server: 8.8.8.8

Alternate DNS Server: 8.8.4.4

Step 5 – Finally, the user has to click OK and save all the changes.

Read Also:

  1. Printer Driver is Unavailable
  2. YouTube Dark Mode
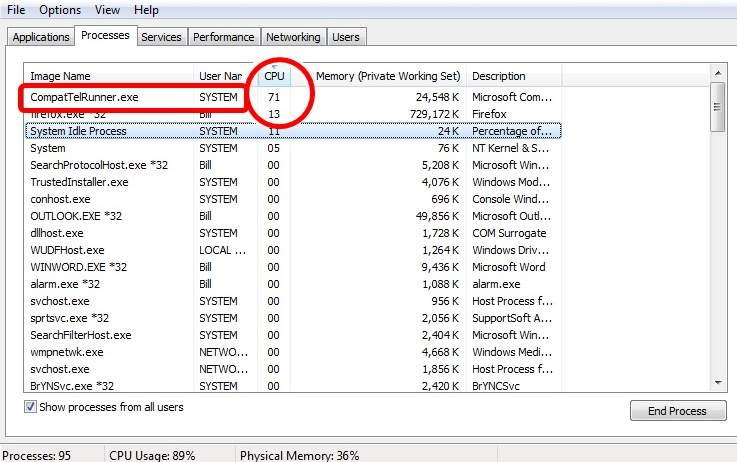
  3. Microsoft Compatibility Telemetry
  4. 0x80300024

Method 2 Reset the Winsock Program

Winsock is a program interface and one of the supporting programs as well. It is programmed to handle the input and output requests for Internet applications in the Windows systems of the user’s computer. So, if this program does any misconfigurations, it can result in DNS_PROBE_FINISHED_NXDOMAIN error.

Therefore, the user can solve their problem by Resetting the Winsock. The resetting process of Winsock is straightforward, fast and efficient. Many users around the globe were able to solve their problem.

The following steps would help the users to follow the solution:

Step 1 – The user first has to open the Run dialog box [they can do so by pressing the Windows key and the R key together. After that the user has to type CMD, to find and select the Command Prompt.

Step 2 – Once the user finds it, they have to right-click on it and select Run as administrator option.

Step 3 – After that, the application would open, and then the user has to type down the following commands in the box, and then the user has to press Enter.

netsh Winsock reset

Step 4 – The user has to wait for the computer to process the command and then once the process is over, they then have to restart their computer and see if the problem is solved or not.

Method 3 Reset Chrome Flag Settings

This method is one of the most influential and proofed ways tried by many users online. There are steps that would help the user to conduct the method themselves:

Step 1 – The user has to type the following URL in the address bar:

Chrome://flags/

Step 2 – Then the user has to press Enter and let the Browser load the page.

Step 3 – After that, a setting page would open, and on the right side of the window, the user would find a reset and default option. They have to click that option.

Step 4 – The last step would reset their settings to default. The user can try to access the web, which is using the Chrome browser and check if the problem has been solved or not.

Method 4 Restarting the DNS Client

Sometimes the old tricks can work magic on some very tricky problems. The old trick of closing and restarting of the application can work as a solution for this DNS_Probe_Finished_NXDomain Error too.

The following steps would help the user to follow the method correctly:

Step 1 – The user first has to open the Run dialog box by pressing the Windows and the R key together. After that, the user has to type services.msc, and then the user has to click on OK

Step 2 – In front of the users, a new window would open, which would display the list of services. The user has to scroll down to find the service that has the name of DNS client.

Step 3 – Once the user finds that service, then they have to right-click on it and select the option of restart from all the other options from the pop-up list that appears after the right-click.

Step 4 – Once the user selects the restart option from the list. The DNS client service would restart itself. And after that happens, the user has to wait for a few minutes the user can surf the internet and then the user has to check if the solution had solved their problem or not.

Method 5 – Using Command Prompt

The DNS_PROBE_FINISHED_NO_INTERNET error can be solved by other commands as well. There have been many commands to renew flush or even release DNS settings. There are high chances that one command would not work to solve the error. But that would not mean that another command would not work for solving the issue. The user can always try out different commands to solve their problem.

There are some other commands that would help the user to solve their problems. The following steps would enable the user to apply the command in their computer:

Step 1 – The user first has to open the Run dialog box by pressing the Windows key and the R key together. After that the user has to type CMD, to find and select the Command Prompt. Once the user sees it, they have to right-click on it and select Run as administrator option.

Step 2 – After that, the command prompt application will open.

Step 3 – After that, the user has to type the commands given below one by one, so each command is applied properly. And after each command, the user has to press enter to for applying each command correctly. The commands are as followed:

ipconfig /release

ipconfig /all

ipconfig /flushdns

ipconfig /renew

netsh int ip set DNS

netsh Winsock reset

Step 4 – After applying all the commands, the user has to restart their computer. And check if their problem of DNS_PROBE_FINISHED_NXDOMAIN error has been solved or not.


Read More:


Conclusion

The above five methods have been used by many people and have proved to be very useful, easy, and efficient. You can use these methods to solve the DNS_Probe_Finished_NXDomain in your devices. Hopefully, these methods were useful and were able to solve the problem.

Outlook Won’t Open on Windows 10 and Mac [Solved]

Outlook Won't Open on Windows 10 and Mac

Sometimes Outlook user face Outlook won’t open, Cannot start Microsoft Outlook, or Cannot open the Outlook Window error. Outlook won’t open generally arises when you are waiting for an important email, and some reasons are:

  • Outdated Outlook Software.
  • Profile in need to repair.
  • Corrupted window.

How to Fix Outlook Won’t Open on Windows 10 and Mac

If you encounter Outlook not opening error too, then don’t worry, I am going to show you all the possible and working methods to fix the Outlook won’t open.

Method 1 – Uninstall VPN Software

VPN stands for Very Personal Network. VPN gave you features to allow surfing and downloading the stuff from the internet privately. Generally, people need security and privacy of networks, so they use VPN. If a VPN exists in your PC, then make sure to remove it or disable it because one of the reasons Outlook wouldn’t open is due to the continuous running of a VPN.

Method 2 – Use Microsoft Support and Recovery Assistant

Outlook won’t open error can be fixed by using Microsoft Support and Recovery Assistant tool. This tool is used to fix the common problem. So running the Microsoft support, and recovery assistant is an easy and effective method to fix the error.

Method 3 – Start Outlook in Safe Mode and Disable Add-ins

Start Outlook in safe mode and disable add-ins is also a wise move to fix the Outlook won’t open error by following the steps given below:

Step 1 – Press Windows + R key altogether, the run appears in the bottom left side in the display.

Step 2 – In the dialogue box type Outlook/safe, press enter and then click OK button.

Step 3 – Choose the profile window open, click OK, and then enter the password after doing it click apply and then enter it.

Disable Add-ins

Make sure to disable add-ins before you start Outlook in safe mode.to do so follow the given steps:

Step 1 – In Outlook, go to File and then select an option in the option to choose Add-ins.

Step 2 – Then check in the add-ins (view and manage option), then check whether the Manage box shows COM Ads-ins or not.

Step 3 – Remember to disable all enabled Add-ins and disable the selected Add-ins, then make sure to click OK button.

Step 4 – Close Outlook.

Enable Add-ins

Now you have disabled add-ins make sure to restart the Outlook and enable the adds-ins to fix the issue:

Step 1 – Press the Windows + R key altogether, the run appears in the bottom left corner of the display.

Step 2 – In Outlook, go to File and then select an option in the option to choose Add-ins and enable it.

Step 3 – Restart the Outlook last time.

Step 4 – Enabled the add-ins again and restart the PC make sure to repeat this process until the error has been fixed.

It is a lengthy process, but it is useful, and according to most of the users, the Outlook would be fixed by this method.

Method 4 – Create A New Profile

One of the reasons, Outlook not opening error popup is due to the corrupted profile which gets corrupted due to the viruses and corrupt Windows. You can fix the Outlook error by just creating the new profile to do so here are some of the steps:

Step 1 – Press window button, the menu appears in the form of 2 columns, then click on the Control Panel.

Step 2 – In the control panel, click on the mail option.

Step 3 – In the mail option-click the profile option and changed the profile picture by just adding the image.

Step 4 – Fill the entries are given in the profile, i.e., name, profile picture, email address, and after filling all the entries correctly, click on the next button to move further.

Step 5 – Make sure to make all the options manual.

Step 6 – Click the Finish button, boom your profile have been ready to work.

Step 7 – Then go to the mail dialog. Select Prompt for a profile and then choose the OK button.

I hope the Outlook has fixed by the above method, and once the Outlook has been fixed, you can also retrieve the old profile.

Method 5 – Repair your Outlook Data File

All the Outlook data is stored in the data file. Sometimes data file can get corrupted to repair your Outlook data file, follow the given steps below:

Step 1 – Exit Outlook and go for the office installation folder.

Step 2 – Type SCANPST.EXE. Then press Enter.

Step 3 – Then, to go for Outlook data file by going to browse option.

Step 4 – Now, you can scan the file by starting the scan option. Whereas it led to repair the file.

Alternative

The alternate option is using Microsoft Exchange, as it has the feature of deleting your data file, to do so follow these steps.

Step 1 – Press window button menu appears in two-column, click on the control panel and select mail.

Step 2 – Select an Email Account in the Mail window.

Step 3 – Go to the data files tab, then choose the open file location.

Step 4 – A new window explorer window will open make sure to close all the other Windows, then all you need to locate the data file and delete it.

Make sure to open the Microsoft Outlook again. The alternate method is more efficient than the other method because this method is from Microsoft, who manufactures the Outlook.

Method 6 – Outlook Should Not Be Running in Compatibility Mode

Compatibility mode is used to run the software in Windows 10. When it failed to run in the display basically, it forces to run the software. Here are some steps to do so:

Step 1 – Find the folder destination of Outlook.exe.

Step 2 – Right-click on the Outlook .exe folder and sub click on the properties then choose compatibility mode.

Step 3 – Make sure to uncheck all the compatibility mode option and then click on the apply button.

Step 4 – Make sure to restart the Outlook to see the changes.

Method 7 – Make Changes in DPI Setting

According to most of the user, Outlook error has been fixed by just changing the DPI scaling into 100% to do so here are some steps:

Step 1 – Right-click anywhere on the desktop and choose the display settings.

Step 2 – Display setting opens change the DPI scaling into 100 % by just sliding with the help of your mouse.

Step 3 – Just restart your PC after doing both the steps to see the changes.

Just change the DPI to 100% by the above steps to fix the Outlook not opening issue.

Method 8 – Use the New Email Message Option

Make sure to shut down the Outlook completely. We recommended choosing the Task manager option to open the task manager option to make sure to follow the given steps:

Step 1 – Press Ctrl + Alt + Delete altogether on your keyboard.

Step 2 – Menu appears to click on the search bar and type task manager.

Step 3 – Click on the start task manager option.

Step 4 – Start the Task Manager process.

Step 5 – Right Click on the Microsoft Outlook and close the application.

There is an alternate method too. If the above steps don’t give you results then, you can use the new email option to implement this message. Here are some of the steps.

Step 1 – Locate the Outlook at the start in the menu and then right-click on it.

Step 2 – Select the new email message, or in some window, it displays as the new meeting option, both are the same thing.

Step 3 – A new window option appears, then right-click on the administrator option.

After following the above steps, the Outlook will open. If it doesn’t, then do follow another method as given below.

Method 9 – Use Different Password for Outlook

Here are some steps to follow to fix the Microsoft Outlook:

Step 1 – You need a Gmail account by which the Outlook has been connected.

Step 2 – Just generate the 16 digit app password and remember the password, you need to remember as it gives you access for Microsoft Outlook.

The issue gets solved if it is not; then, make sure to remove the Gmail account, which is connected to Microsoft Outlook.

There is the second alternative method too, which also provide more security to Outlook, and sometimes the error get fixed by given steps as shown below –

Step 1 – Right-click on the Outlook.

Step 2 – Menu appears to go to the File tab.

Step 3 – Then click on the account setting.

Step 4 – Generate the password for the Outlook.

Method 10 – Try Closing the Outlook With This Way

I know you surprised by this method and thinking what the rubbish is this how changing the way you close the Outlook, fix the Outlook error. According to the survey, it has been said that most of the user closed the Microsoft Outlook by just pressing the “Close” button.

Some of them used to close the Outlook by just pressing the power button, believe me, which is the worst option one of the reasons which cause the corruption of the window is pressing the power button directly.

The recommended option to close the Outlook is by choosing the File option in the Microsoft Outlook then click on the Exit button. This method reduced the chance of the error display in the Microsoft Outlook.

Method 11 – Send File Using Outlook

According to most of the users, sending the file with Outlook fix the Outlook error, so here, I am going to show you how to send the file via Outlook to fix the Outlook error.

Step 1 – Open Microsoft Outlook.

Step 2 – Create a message.

Step 3 – Then click on the Mime cast tab.

Step 4 – If you want to attach the file, then select the file you want to attach.

Step 5 – Last but not least, click on the send button.

Here is the alternative method of sending any file with Outlook.

Step 1 – Open the File Explorer.

Step 2 – Select the file you want to send.

Step 3 – Right-click on that file and click on the send to a mail recipient.

By following any of the methods you can send any file with Outlook.

Method 12 – Deleting the Outlook AppData Folder

Deleting the Outlook data folder led to fix the Outlook not opening error, sounds simple. Here I am going to show you some of the steps which led to the delete Outlook data folder and result in the Outlook data folder fixed. This method required to shut down the Outlook data folder, so makes sure to delete the Outlook data folder.

Step 1 – Press Windows + R key altogether in your keyboard; the run appears in the bottom left side of the display.

Step 2 – Type %localappdata% in the dialogue box and press enter.

Step 3 – Search the Microsoft folder.

Step 4 – Then, locates the Outlook folder and make sure to delete it.

You can also try the alternate method is to delete the Outlook.xml file.

Step 1 – Press Windows + R key altogether in your keyboard; the run appears in the bottom left side of the display.

Step 2 – Type %localappdata% in the dialogue box and press enter.

Step 3 – Search the Microsoft folder.

Step 4 – Locate the Outlook.xml file and delete it.

You can also try any of the two methods; both can fix the Outlook won’t open issue.

Method 13 – Permissions to Access PST File

PST file holds all the information related to Microsoft Outlook. Whereas to access the PST file, you need permission; if you try some invalid method, then it might be possible you face an error that led to an Outlook would n’t open, but luckily, we got few steps to fix the Outlook not opening error.

Step 1 – Locate the PST folder.

Step 2 – Right-click on the PST folder.

Step 3 – Choose Properties on the menu.

Step 4 – Go to the security section and check whether the username is available or not. If the username is not displayed, then edit the username column.

Step 5 – You can add the user name by just clicking on the Add button.

Step 6 – Add the username by typing the genuine name.

Step 7 – Press the OK button.

Step 8 – Select the username from the group of the user names.

Step 9 – Click the Apply button and then an OK button to save changes.

It is recommended to restart the PC, and after restarting, I hope there will be no error.

Method 14 – Run SFC /Scannow Command Prompt

The work of the SFC /Scannow command is to scan all the system files and resolve the corrupt file by replacing the cached copy. You can solve the failed to play test tone issue by following the steps below:

Step 1 – Press the Windows + X button altogether on your keyboard. The main menu appears.

Step 2 – Press the Windows key in the keyboard in the bottom right search option appears type “cmd” in the search option and enter the keyboard.

Step 3 – Then right-click on the search “cmd” and click on the run as administrator. It will open an Elevated Command Prompt.

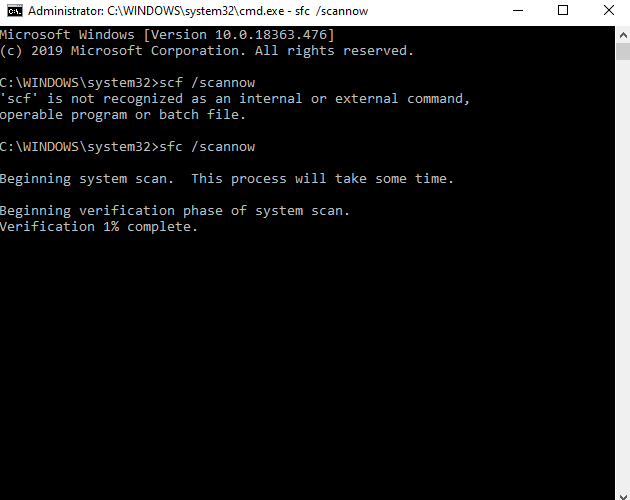
Step 4 – Elevated command prompt display in the screen then type SFC/Scannow press enter. As shown below

Step 5 – Scan in the “cmd” start wait for the scan to end, and it will automatically reboot your device once it has done.

More than 60% of users fix the Outlook won’t open error by using this method.

Method 15 – Reset the Navigation

This method works better on Windows 10; here are some steps to fix the Outlook.

Step 1 – It is mandatory to close the entire tab to get the best result.

Step 2 – Press Windows + R key altogether, Run box will appear in the display. Type Outlook.exe /resetnavpane in the dialogue box then press Enter.

The command will open, and the result is the deletion of all the customized related to the navigation and hope the Outlook has been fixed by this method. If not, then try a different method.

Method 16 – Delete the Registry Key

Deleting the registry key can be led to fix the Outlook not opening error. Some of us don’t follow all the steps thoroughly. In that case, you can backup your registration key. To delete the registry key follow the steps given below:

Step 1 – Press Windows + R key altogether in your keyboard the Run box appears in the bottom left side of the display.

Step 2 – Type Regedit in the dialogue box and press enter.

Step 3 – Search in the list, HKEY_CURRENT_USERSoftwareMicrosoftWindows NTCurrentVersionWindows Messaging Subsystem. Click on it to expand it.

Step 4 – Then choose the profile key, right-click in the profile key, and click on the delete option.

Step 5 – Make sure to restart your PC after doing all the 4 steps.

Method 17 – Log out of iCloud

iCloud is the cloud storage provider created by apple, whereas they provide the iCloud service in the entire apple platform. Here I will show you some of the steps which are its elf suggested by the Apple:

Step 1 – In Mac, go to the settings.

Step 2 – Scroll down to see the logout option.

Step 3 – As you find the logout option make sure to hit it.

Step 4 – Then, you get an option of your apple id and password, which is a mandatory option in the Apple device as they provide a high level of security.

Step 5 – Tap the logout option again.

By following these steps, you are successfully able to logout your iCloud in apple.


Read More:


Conclusion

Here I have suggested all the working, possible and practical methods that anyone could initiate it. I hope any of the given methods could able to fix the Outlook won’t open error. If not, then don’t worry, try another method as there is a vast number list of ways.

How to Enable Adobe Flash Player on Chrome, Firefox, Edge and Safari

How to Unblock Flash Player on Chrome, Firefox, Edge and Safari

How to Enable Adobe Flash Player: Adobe Flash Player is one of the popular computer software. Enormous people use it for many purposes. It might be already installed in a few systems, and for those who do not possess Adobe Flash Player, they can enjoy the services through the plug-in extensions, which are widely available online. Adobe Flash Player is compatible with many operating systems like Windows, Mac OS, and Linux, etc.

Moreover, Adobe Flash Player can be downloaded for free in recent versions. Users who use Firefox as their default browser are obliged to download the Adobe Flash Player software if they wish to watch the flash content available in the Adobe Flash Player. However, if you are using Google Chrome, Safari, Microsoft Edge, and Internet Explorer you can enable the Adobe Flash Player from your own settings menu.

How to Enable Adobe Flash Player On Google Chrome

Step 1: Launch Google Chrome from your system by double-clicking on the chrome icon found either in your Taskbar, Desktop, or Start Menu.

Step 2: Click on the Customize and control button. It is the three horizontal dots available at the top right corner of the screen.

Step 3: As soon as you click on the button, a drop-down menu will appear. From the obtained list, click on settings and open it. You can also access settings by inputting “chrome://settings” in the browser URL box to open settings.

Step 4: Scroll down and locate the Advanced option, tap on it to open.

Step 5: Further, slide down and click on the Content Settings found adjacent to privacy and security options.

Step 6: At the center pane of the page, you can see an option called Flash, tap on it.

Step 7: There is a toggle button next to Block Sites from running flash. Enable it by sliding which turns Blue if enabled. This function interprets to the system that you can retrieve flash content on ask first basis. In case you find it to be blue already, then it means the Flash player has been enabled.

Step 8: If required, unblock a particular site on your own. There are chances you might have blocked few sites to access Flash content, you can enable it again by visiting your block list and choose the site on which you want to use the flash and click on the three horizontal dots icon found adjacent to it and tap on the remove option from the drop-down menu listed.

Step 9: Chrome isn’t authorized to load and display the Flash content automatically, so you will have to enable flash links on the Flash window and if prompted click the Allow button in order to watch the flash content uninterrupted.

Likewise, clicking on the Adobe Flash Player link will function the exact same way as Enabling the Flash icon.

How to Enable Adobe Flash Player On Firefox

Step 1: Double click on the Firefox icon found either on the desktop or the Start menu to launch the Mozilla Firefox browser.

Step 2: Visit the Adobe Flash Player official site by clicking on the link below: https://get.adobe.com/flashplayer/

Copy the link and paste it in Firefox search bar and press Enter.

Step 3: We advise you to carefully uncheck the options to make sure Adobe Flash Player does not install unwanted programs on your system along with the required one.

Step 4: In the webpage you will find a yellow button on the lower side which reads Install now, click on it to install the software.

Step 5: If prompted, click on Save File to download the file on your system.

Step 6: Exit the Firefox browser after completing the process. We advise you not to skip this step at any chance because doing so will restrict you from installing Flash player plug-in to Firefox if the browser remains open. This in turn doesn’t allow the browser to load flash and display the Flash Content although the Flash Player is already installed.

Step 7: Now move to your download folder in your system and locate the Adobe Flash Player file. Double click on it to install the software. Proceed by following the wizard until you reach the Finish. Once you see the Finish button on the screen window click on it to install the Flash player in your system.

Step 8: Once the installation is successful, exit the browser window that you have opened earlier. Continuing which, re-launch the Firefox browser.

Step 9: Click on the three horizontal lines found at the top right corner of the browser. Now, a drop-down menu will appear for you.

Step 10: From the drop-down menu, choose Add-ons option and click on it to open the list of add-ons available in your Firefox.

Step 11: On the left panel of the page, you will find a plugins tab tap on it.

Step 12: Then click on the “Ask to Activate” drop-down menu from the adjacent “Shockwave Flash” heading. Now tap on “Always Activate” in the corresponding drop-down menu. You can ignore this step if you wish for the Firefox to request you for permission before playing Flash content.

Step 13: As the final step, since you have enabled the automatic use for flash player, browsing a page that includes flash content will allow the user to view the content automatically. Considering another scenario, if your browser’s Flash player is set to “Ask to Activate” then, you will have to tap on the flash content. Next, choose Allow from the prompted pop-up window.

How to Enable Adobe Flash Player On Microsoft Edge

Step 1: Start your Edge Browser by either clicking on its icon at the desktop or by locating the browser in the start menu and open it.

Step 2: Open Settings by either pressing Alt key + X on your keyboard or click on the button with three horizontal dots at the top right corner of the Edge browser’s window. Now choose Settings from the drop-down menu displayed and tap on it.

Step 3: Now scroll further down to locate View Advanced settings and tap on it.

Step 4: Activate the Use Adobe Flash Player by sliding the toggle switch found next to it. You will know the player is enabled in Microsoft edge as the switch turns blue when activated.

In case the switch is already turned blue then it means the Adobe Flash Player has been enabled. There is no need for the user to press the Allow button displayed in the pop-up box every time because Microsoft Edge will load and display the Flash content automatically.

How to Enable Adobe Flash Player On Internet Explorer

Step 1: Launch Internet Explorer browser on your system by either clicking on its icon found on the desktop or in the Start menu.

Step 2: Open Tools by either pressing Alt + x on your keyboard or press on the Gear shaped icon found at the top right corner of the browser.

Step 3: A dropdown menu will appear as soon as you click on the Tools. From the list of options select Manage add-ons and click on it to open.

Step 4: Under Manage Add-ons, on the left panel of the window there are few Add-on Types. Tap on Toolbars and Extensions tab from the given list.

Step 5: On the left panel there is a drop-down menu under Show. Click on the All add-ons option from the menu.

Step 6: Now in the Center pane, locate the option Shockwave Flash object and click on it.

Step 7: Enable this particular object by clicking on the enable button found at the bottom right corner of the window. Doing so will activate the Flash player. If you find the disable button then it means that you have already enabled the Flash player in your Internet Explorer. You don’t have to explicitly enable it again.

Step 8: Again click on the Close button found at the bottom right corner of the window to apply to exit the window and apply the changes. You should be able to view the Flash content from here onwards. Even in Internet Explorer, the user doesn’t have to click on the allow button every time to view the Flash content. Internet Explorer will load the content and display it to the user automatically.

How to Enable Adobe Flash Player On Safari

Safari browser is used in systems that run on the Mac Operating system.

Step 1: Click on the Safari icon to launch.

Step 2: At the top left corner of the screen locate the Safari button and tap on it. Now a drop-down menu will appear for you.

Step 3: Choose the Preferences option from the drop-down menu and click on it to open it in a new window.

Step 4: Under the Preferences window click on the websites tab. You will find it at the top of the browser.

Step 5: Further, below the “Plug-ins” section, choose the Adobe Flash Player tab and tap on it. You will get it at the lower side of the window.

Step 6: Tap on the “When visiting other websites” drop-down box found at the bottom right corner of the window. Doing so will display a drop-down menu.

Step 7: From the list of options in the drop-down menu, choose On and click on it. On option will enable the Flash player in your Safari browser so that you can view the Flash content from the Adobe Flash Player. Even in the safari browser the flash content is automatically loaded and displayed for the user. So that you do not have to click on the allow button every time it plays.

Step 8: Adobe Flash Player might not be enabled for all the open websites. In the main window if you find any websites with the text off, then click the off option from the drop-down menu and tap on the On button in the resulting menu.


Also Read:


Conclusion

With the thought that you have diligently gone through the article to use the Adobe Flash Player in your system. So by the end of the article, we hope you found what you were looking for. As we have carefully analyzed Adobe Flash Player plug-in and its working in various browsers. Hence, we have come up with a solution for each browser. So that the users can enjoy the Adobe Flash Player privileges.

How to Change Brightness on Windows 10

How to Change Brightness on Windows 10

We indeed spend an enormous amount of time on our PC – coding, designing or playing games, etc. We must understand that it might affect our vision if pursued without proper care. It is when you should educate yourself about how much screen brightness is necessary for you. Today you will see how to change screen brightness on Windows 10 PC with the necessary controls.

It is an essential task to adjust brightness on your computer depending upon whether you are working indoors or outdoors. While few of the users manually change the display brightness keeping in mind the constraints around them, users can also let the PC automatically modify the brightness based on the factors like surrounding, battery usage, etc.

How to Change Brightness on Windows 10

Method 1 – Manually Change Brightness in Windows 10

Step 1 – Start Settings by holding Windows key + I.

Step 2 – Now navigate to Settings > System > Display. There is a slider under the Brightness and colour section named Change brightness, slide it to adjust the brightness.

In case you cannot find a slider in that section it’s either because you are currently using an external monitor, so you have to use the buttons on it to adjust the screen brightness, or your display driver is outdated, so kindly update it.

Step 3 – To update your display driver, press Windows key + X, and select Device Manager from it.

Step 4 – Elaborate the Display adapters and right-click on your graphics card. Then click on Update driver and keep going until you reach the finish.

Method 2 – Using the Windows Mobility Center

There is another utility available in Windows 10 for users to change the screen brightness, i.e. Windows Mobility Center. Hold Windows key + X and click on the Mobility Center from the listed options. Finally, you can use the Display Brightness Slider here to adjust the brightness.

Method 3 – Using Adaptive Brightness in Windows 10

In ideal systems, your screen brightness changes automatically depending upon the light around your surroundings. But to avail of this feature, your system needs to have a brightness sensor. Follow the steps given below to enjoy this feature.

Step 1 – Press Windows key + I to open settings. Now go to settings, and click on Display. There will be a button named Change brightness automatically when lighting changes, turn it on. If you cannot find such a button, then, unfortunately, your system does not have the brightness sensor.

Step 2 – The same can also be achieved through the Control panel. So, press Windows key + R and input “control panel” then press OK.

Step 3 – As soon as the control panel window is open, click on Hardware and sound option. Again, click on the Power Options button and choose Change plan settings. This time, click on Change advanced power settings.

Step 4 – under the power options tab, you will find a list of settings. Expand Display > Enable adaptive brightness and use the dropdowns to set it for both On battery and Plugged in plans.

Method 4 – Change Brightness Using the Keyboard

Some of your keyboards contain shortcuts to modify your brightness suitable for your choice so you can access them easily. Although quite a lot of laptops have this feature. Listed below are the keys which can be used to adjust the brightness. You can identify the keys easily as they have a sun icon printed upon them.

The precise key combination differs for every keyboard model. You should press the [Fn] key along with the corresponding function key. For instance, on Huawei Matebook laptop, you need to press Fn key disabled and press F1 to lower brightness and F2 key to increase brightness significantly. (Fn key needs to be disabled or else Fn key would activate F1/F2).

Method 5 – Change Brightness on Windows 10 Using Shortcuts

Follow this method for two efficient and simple shortcuts used for adjusting the brightness settings.

Step 1 – You can change the brightness using an Action centre icon usually found on the taskbar or press Windows key + A on the keyboard. Move the brightness slider to the level you desire.

In case you cannot find the icon anywhere on the taskbar, hold Windows key + I, move to System > Notifications & actions > Edit your quick actions. Furthermore, click on Add > Brightness > Done.

Step 2 – Few users are not satisfied with the system services, so they rely on third-party utilities. Here we have named one such utility, refer to this Github project and download the file.

Step 3 – Click on the file to open it; this will include a brightness icon to your system tray automatically. For those users who want to access it regularly can place it in a default position—Right-click on the icon and select Run At Startup.

Method 6 – Automatically Adjust Brightness for Battery Life

Working with high brightness usually results in a system draining battery life. Fortunately, Windows 10 comes with a battery saver tool that automatically reduces your screen brightness if it is enabled.

Step 1- As mentioned above, open settings by holding Windows key + I on your keyboard and tap on System > Battery and scroll further down until you reach Battery saver settings.

Step 2 – Enable the checkbox found next to Turn battery saver on automatically if my battery falls below and then adjust the slider to the battery percentage level where you want this feature to activate automatically.

Step 3 – Further, check the Lower screen brightness while in battery saver checkbox. Remember this feature will not allow you to set the brightness.

Method 7 – Automatically Change Brightness for Power Plan

Your Laptop might have different brightness depending on the factors, whether it is charging or working on battery life. For instance, while working with laptops to make sure the PC doesn’t consume more battery set it to a lighter brightness when it’s not plugged in.

Step 1 – Launch control panel which is either found on your taskbar or hold Windows key + R to start run the utility and input the text “control panel” in the Run dialog box. Finish it by pressing OK.

Step 2 – Now, go to Hardware and sound section > click on the Power options button. Then under select a power plan, you can see two options. Choose your plan and select the Change plan settings button found next to it.

Step 3 – As you can see individual slider named Adjust plan brightness under both On battery and Plugged in. Move the slider to adjust the battery and click on the save changes button to apply the changes button.

Don’t Miss: How to Activate Showtime Anytime

Conclusion

Guiding yourself about reducing and increasing the screen brightness appropriately can help in countless ways whether it is about protecting your eyes from being strained or saving your battery life. We hope you found this article to be helpful in discovering various methods that can be used to adjust your screen brightness based on your choice.

Error Code 0x80073712 in Windows 10 [Solved]

Update Error Code 0x80073712 in Windows 10

Sometimes there are complaints about the Windows Update Error Code 0x80073712. Where the update is not being able to update successfully. It happens when there is a file that is important for the update to complete but it’s either missing or deleted.

Update Error Code 0x80073712 in Windows 10

How to Fix Windows Update Error 0x80073712

There are a few methods to solve this error. With proper guidance and steps, the users would be able to completely eradicate the Update Error 0x80073712 from its roots.

Method 1 – Run the Windows Update Troubleshooter

Every Windows operating system has an inbuilt troubleshooter, and it has proved to work very efficiently in solving many problems in the system. So here are the steps the users could use for applying the troubleshooter application in the system:

Step 1 – The user can search for the application by pressing the Windows key and then typing the application’s name. [The user has to click on the option troubleshooting under the control panel.]

Step 2 – Then the user has to click on the fix problems of updates under the System and Security.

Step 3 – After that last step, the application of troubleshooting would start. The application would find the problem and highlight it after solving it. The user has to wait until the running of the scan gets completed.

Step 4 – After that, the user has to try updating the window again. If they find the Windows Update Error 0x80073712 again then they have to try a different solution.

Method 2 – Using the System Update Readiness Tool

Users don’t always release that they might have to use this tool to prep their window 7 device for the update to window 10. And sometimes using this tool actually helps in solving this problem.

The following steps would help the users to do so:

Step 1 – The user has to download the tool from here

Step 2 – Then the user has to run the tool in their device. And then the user has to follow the onscreen instructions

Step 3 – After the scan gets over the user has to check if their problem is solved or not.

Method 3 – Use Windows Media Creation Tool

Sometimes this issue is not fixed till the user performs an in-place update. In this solution, we recommend using the Windows Media Creation tool for performing the in-place update. The following steps would help in doing so:

Step 1 – First, the user has to download the app Windows Media Creation tool

Step 2 – Then they have to accept the prompts and pop-up Windows.

Step 3 – Then the user has to select the “Upgrade this PC Now” option.

Step 4 – Then they have to select the “Keep Personal Files” option and in the next prompt that the user has to click on the install option.

Step 5 – After that, a set up would start, the user has to wait till it finishes. Then see if the Error 0x80073712 still stays or not.

Method 4 – Run the DISM

Just like the troubleshooting application. The system has many other in build applications. Among which there is a tool name Deployment Image Servicing and Management Tool. The tool serves Windows. And can help in solving any kind of problem with the Windows updates. Many people around the internet server stated that this had helped them solve the problem too

The following steps would help the user to implement the solution:

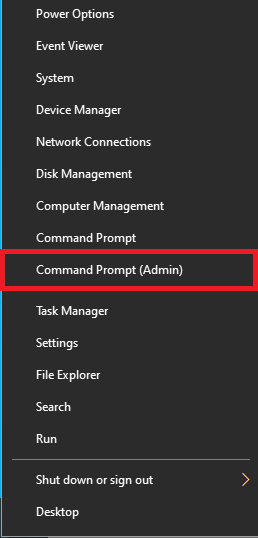
Step 1 – The user has to press the Windows key and X key, together and then select the Command Prompt (Admin) from the menu what will pop-up on the window [the user can also Click on Start and then type cmd in the box after that the user has to right-click on cmd and lastly they need choose Run As Administrator.

Step 2 – When the command prompt opens up the user has to put in the following commands into the box:

DISM.exe /Online /Cleanup-image /Scanhealth
DISM.exe /Online /Cleanup-image /Restorehealth

Note – The users have to be careful while inputting these commands on their computer, as anyone small mistake can hamper their computer or other devices. The user has to make sure that they press “enter” after every command for it to get implemented. And the user has to make sure that the first command is completed before they start implementing the second one.

Step 3 – The user has to wait until all the commands have been applied correctly. And then they have to close this application by either clicking on the close icon or by typing exit and then press Enter.

Step 4 – After that lastly, the user has to run the updates again and check if the Update Error 0x80073712 has been solved or not.

Method 5 – Reset Basic Elements Using Commands

Many times, these kinds of problems can be solved by using and inputting very simple commands. Some users have used this method and they have stated that it has been effective in rooting up their problems.

The following steps would help other users to solve their problems too:

Step 1 – The user has to open the run dialog box (they can do it by pressing Windows key and R key together).

Step 2 – Then they have to type in the box “cmd” and then press shift control and enter together to get the administrative privileges.

Step 3 – After that, the user has to put in the following commands in the window that opens up next:

net stop trustedinstaller

cd %windir%\winsxs

takeown /f pending.xml /a

cacls pending.xml /e /g everyone:f

del pending.xml

net stop wuauserv

ren c:\Windows\SoftwareDistribution softwaredistribution.old

net start wuauserv

Step 4 – After putting all the commands in the device, the user has to finally check if their Error Code 0x80073712 has been solved or not.


Also Read:


Conclusion

Hopefully, any of these solutions would help any user to get rid of the Windows Update Error 0x80073712. But if the problem still prevails then visiting the nearest service system would be wise.

Taskbar Showing in Full Screen Error [Solved]

Taskbar Showing in Full Screen

The Taskbar Showing in Full Screen Error is witnessed generally when we use Google Chrome. Google Chrome is a freeware web browser developed by Google to be used for Microsoft Windows in 2008. Later, it became popular among other operating systems too. Its market share is growing rapidly, and currently, it is 54% among all internet platforms and is expected to grow more in the future.

Taskbar Showing in Full Screen

It is a very popular web browser, but it certainly has a few bugs in it, which hinder the user’s quality experience. One of those errors is the taskbar showing while using full-screen mode. Many users encounter that whenever they play a YouTube video or any other video on the browser in full-screen mode then, the taskbar appears on the screen, which is not supposed to be seen in full-screen mode, the whole screen is occupied by the video itself.

How to Solve Taskbar Showing in Full Screen Error

Well, there is no need to be stressed about there are a few methods through which you can fix Taskbar Showing in Fullscreen issue. In this article, you will find all the conventional methods that you can apply to get rid of the taskbar won’t hide the issue.


Related Guides:-


Method 1 – Restarting Explorer.exe

Explorer.exe is a GUI app, also known as File Explorer. It is a file managing application that was included in the Microsoft operating system Windows to help users to access their file system. Many users claimed that their issue of taskbar showing in full-screen mode was resolved when they restarted their file explore as it is the main medium of navigation in your Windows machine, therefore, there is a possibility that your issue will be resolved after restarting your file explorer. To implement the method, follow the steps mentioned below.

Step 1 – Firstly, press Windows key + R, this will open the Run Application.

Step 2 – Now in the dialog box type ‘taskmgr’ to open your systems task manager.

Step 3 – Next, click on the tab named Processes situated on top of the window.

Step 4 – Now, search for the task of Windows Explorer in the list of Processes. Click on it and then press the ‘Restart’ button you will find at the bottom left side of the Window.

Read Also:

  1. WLDCore.Dll
  2. Error Loading Player No Playable Sources Found
  3. 403 Forbidden
  4. Bad Pool Header Error in Windows 10 {Fixed}

Method 2 – Overriding high DPI Scaling Behaviour in Chrome

If the method mentioned above did not work for you, then you can try overriding high DPI scaling behavior in Chrome. This solution might fix your issue. Follow the steps mentioned below for implementation.

Step 1 – First, right-click on the Google Chrome icon present on your taskbar, then again right-click on Google Chrome mentioned in the list and at last select Properties.

Step 2 – Now, in properties, go to the Compatibility tab that you can find at the top of the screen.

Step 3 – Further, in the settings tab, select the line that says ‘override high DPI scaling behavior.’

Step 4 – Later, click on Apply to save changes and the exit from the Window.

Step 5 – Finally, restart your Google Chrome to check the issue has been resolved or not.

Method 3 – Turning Visual Effects Off

If the solutions mentioned above were unable to solve your problem, then there might be a possibility that this issue still persists due to your Windows. Window’s visual effects are generally known to mess with other applications. So you can try turning off your Windows visual effects and see if it changes anything.

Step 1 – Firstly, press Windows key + R, this will open the Run Application.

Step 2 – Now in the dialog box type ‘Control Panel’ to open your systems Control Panel.

Step 3 – Now, in Control Panel, go to System and Security.

Step 4 – Next, go to the sub-heading System, and after it opens, click on the Advanced System Settings.

Step 5 – Further, a new window will pop up. In that window, go to the advanced tab and click on settings of the Performance category.

Step 6 – At last, click on the checkbox in front of ‘Adjust for Best performance‘ then save and exit.

It will probably solve your current problem.


Other Solutions:-


Conclusion

This article will help you get rid of the issue of Taskbar Showing in Fullscreen. If the methods do not work normally, then it might be because your system requires a reboot after the whole process. So, if they do not work, then try with the reboot once and then run your Chrome as Administrator. Before applying any method, first, go through the complete article and choose the most suitable one. You can always resort to the other method if one does not work for you.

Skyrim Failed to Initialize Renderer [Solved]

Skyrim Failed to Initialize Renderer

Freedom is all which the new era of generation wants in this century. The freedom to explore and go about your journey at your own pace is one of the best things. In this regard, the Bethesda Game Studious developed the best fantasy, action role-playing video game in recent times. The freedom to explore unlimited quests in the created world is all that the game focuses, apart from destroying the Alduin (a dragon which is prophesied to destroy the world). Although this is a solid performing game there are instances when certain flaws occur. Due to this, some Skyrim Failed to Initialize Renderer issues can be solved and are listed below.

Skyrim Failed to Initialize Renderer

How to Solve Skyrim Failed to Initialize Renderer Error

Method 1 – Update Graphic Drivers

A Graphic Driver is the library files which allow an application to use the card installed in the system. The main idea behind Updating the Graphic Driver is we get better Software to squeeze as much out of each Graphic Card as possible. Getting new drivers will speed up graphic card and gaming performance as well.

Outdated or crashed device Drivers on the computer may lead to Skyrim failed to initialize renderer error. Therefore, here are the steps to update Graphics Drivers automatically:-

Step 1 – Firstly, one has to boot the PC in safe mode and type ‘devmgmt.msc’ in the dialogue box then press Enter. Now navigate to ‘Display adapters’ and right-click on adapter and select ‘Uninstall Device’ and uninstall the driver.

Step 2 – In this step, Boot up into normal mode and press Windows key + R. In the dialogue box that appears to type ‘msc’ and hit enter key. Now, it will install the default drivers.

Follow the steps to update graphic drivers automatically. If that doesn’t work install it manually from the manufacture’s website. Once you have installed the drivers, then restart the computer. After that, relaunch your most awaited Skyrim.

Method 2 – Power Cycling the PC

In short, Power Cycling is nothing but restarting one’s computer. For suppose, if any troubleshooting or any technical issues occur restarting your computer plays a key role. It also fixes the Skyrim Failed to Initialize Renderer error. Now, let us see how to Power Cycle the system.

Step 1 – Firstly, close all files and shut it down completely.

Step 2 – Secondly, detach the battery, press the power button, and then place the battery back after few minutes.

Step 3 – Now, restart the laptop and relaunch Skyrim.

While in case of a PC, shut it down completely and remove the main power cable. Then, after waiting for few minutes connect the main cable and check if the Skyrim Failed to Initialize Renderer error is resolved.

Thus, when one restarts the computer, it will bring the system up from scratch, restarting all the software so it will work just like before. Not only in PC’s if there are any issues in one’s electronic devices like in mobile devices or with modems restarting helps to remove some errors.


Read More:


Method 3 – Update Mods and Install the Latest Patches

Mod or Modification is a feature in a game that changes one or more aspects of a video game. This can include getting new weapons, characters, or vehicles. These mods change the etiquette of the game. Due to changes in etiquette, there may be an error in launching a game. Therefore, it is recommended to disable or delete the mods and relaunch the game.

However, if one still gets an error then go to the official website of the game, install the latest patches and relaunch the game. It is done because the developers always seek to improve the performance of their application by providing the best user experience. Therefore, installing the latest patches or updates brings about a host of improvements and tons of new features.

Method 4 – Launch in Windowed Mode

If we talk about the solution of Launching in Windowed mode then Resolution comes into effect. The resolution might be the reason due to which the Skyrim might not be launched. To resolve this issue, the Windowed mode is launched and follow the below steps as shown:-

Step 1 – First, open the Skyrim Launcher.

Step 2 – From the main screen, click on the options and then locate Windowed mode which is usually at the lower left side of the screen.

Step 3 – Check the Windowed Mode box.

Step 4 – Apply the changes.

Step 5 – Now, relaunch the game to check if the Skyrim Failed To Initialize Renderer error is resolved.

Therefore, launching the windowed mode can remove the Skyrim Failed To Initialize Renderer error if not go to the next solution.

Method 5 – Delete the Game Files

 This is probably another option that one can try that is by deleting the game preferences and then relaunching the game. Follow the below steps to know how to delete the game files:-

Step 1 – Before getting into it, close all games and applications.

Step 2 – Find the Stream folder and delete the appcache folder. The steam creates the file automatically while launching.

Step 3 – Then, go to the Skyrim directory. The default path is:

C:\Users\"User name"\Documents\MyGames

Step 4 – Find and delete the following files: Skyrim.ini and SkyrimPrefs.ini.

Step 5 – Now, Power off the computer and turn it back on after a few minutes.

With the above steps, one must be able to launch the game without errors. If the above method doesn’t work then one must walk through how to reinstall and update device drivers.


Also Read:


Conclusion

Thus, the Skyrim which is widely regarded as the open-world fantasy game of all time. People from all over the world play this game. Skyrim has flown to the top of the most grossing games yet, having released over 7 million copies in the first week. The number of players fluctuates daily from over 30,000 to 70,000 per day. If anyone still faces Skyrim Failed to Initialize Renderer they can resolve it using the above solutions.